Resources
Resource management in the Admin Console lets you create, browse, edit, and delete resources registered on a resource server. A resource represents any entity in the system to which access can be controlled — an API endpoint, a UI page, a data object, or a business function. Each resource belongs to a resource server and carries metadata such as URIs, an environment designation, a status, scopes, and ownership information.
Resources sit at the intersection of authorization modeling and enforcement. Permissions bind policies to resources and scopes to determine who can access what.
Goal
Register and manage protected resources on resource servers through the Admin Console. By the end of this guide you will know how to browse resources globally and per resource server, create resources with the three-step wizard, view resource details and linked scopes, edit resource properties, delete resources, and manage resource types and categories.
Audience
Platform engineers, developers, and architects who need to register and manage protected resources through the Admin Console UI.
Prerequisites
- Access to a running Admin Console instance
- At least one resource server configured with authorization services enabled
- Your account has the required permissions for the operations you need to perform:
- Read scope on the Resources resource — to view the resource list and details
- Create scope on the Resources resource — to create new resources
- Update scope on the Resources resource — to edit existing resources
- Delete scope on the Resources resource — to delete resources
The Admin Console enforces permission gates on every action. Buttons and menu items for operations you lack permissions for are hidden automatically.
Before You Start
| Sidebar Path | Destination |
|---|---|
| Authorization > Resources | Resource list page |
| Authorization > Resource Types | Resource types management page |
- Resource servers are the parent containers for resources. Every resource belongs to exactly one resource server. Ensure the target resource server has authorization services enabled before registering resources on it.
- Resource types categorize resources by functional domain (for example, "Payroll Management" or "Permission Management"). Create the types you need before creating resources that reference them.
- Resource categories classify resources by technical nature (for example, "API Endpoint" or "Transactional UI"). Create categories before assigning them to resources.
- Resources can carry scopes — named actions such as
read,write, ordelete— that define what operations are available on the resource. Scopes are defined at the resource server level and associated with individual resources.
Worked Example
Throughout this guide, we use a fictional resource named Employee Records API registered on the Acme HR resource server. The resource has a URI of /api/v1/employees/*, belongs to the HR Management type and API Endpoint category, is owned by admin@example.com, targets the PROD environment, and has an ACTIVE status. You can replace these values with your own resource details.
Steps
1. Navigate to the Resource List
Open the Admin Console and go to Authorization > Resources. The resource list page displays all resources across all resource servers in a global view.
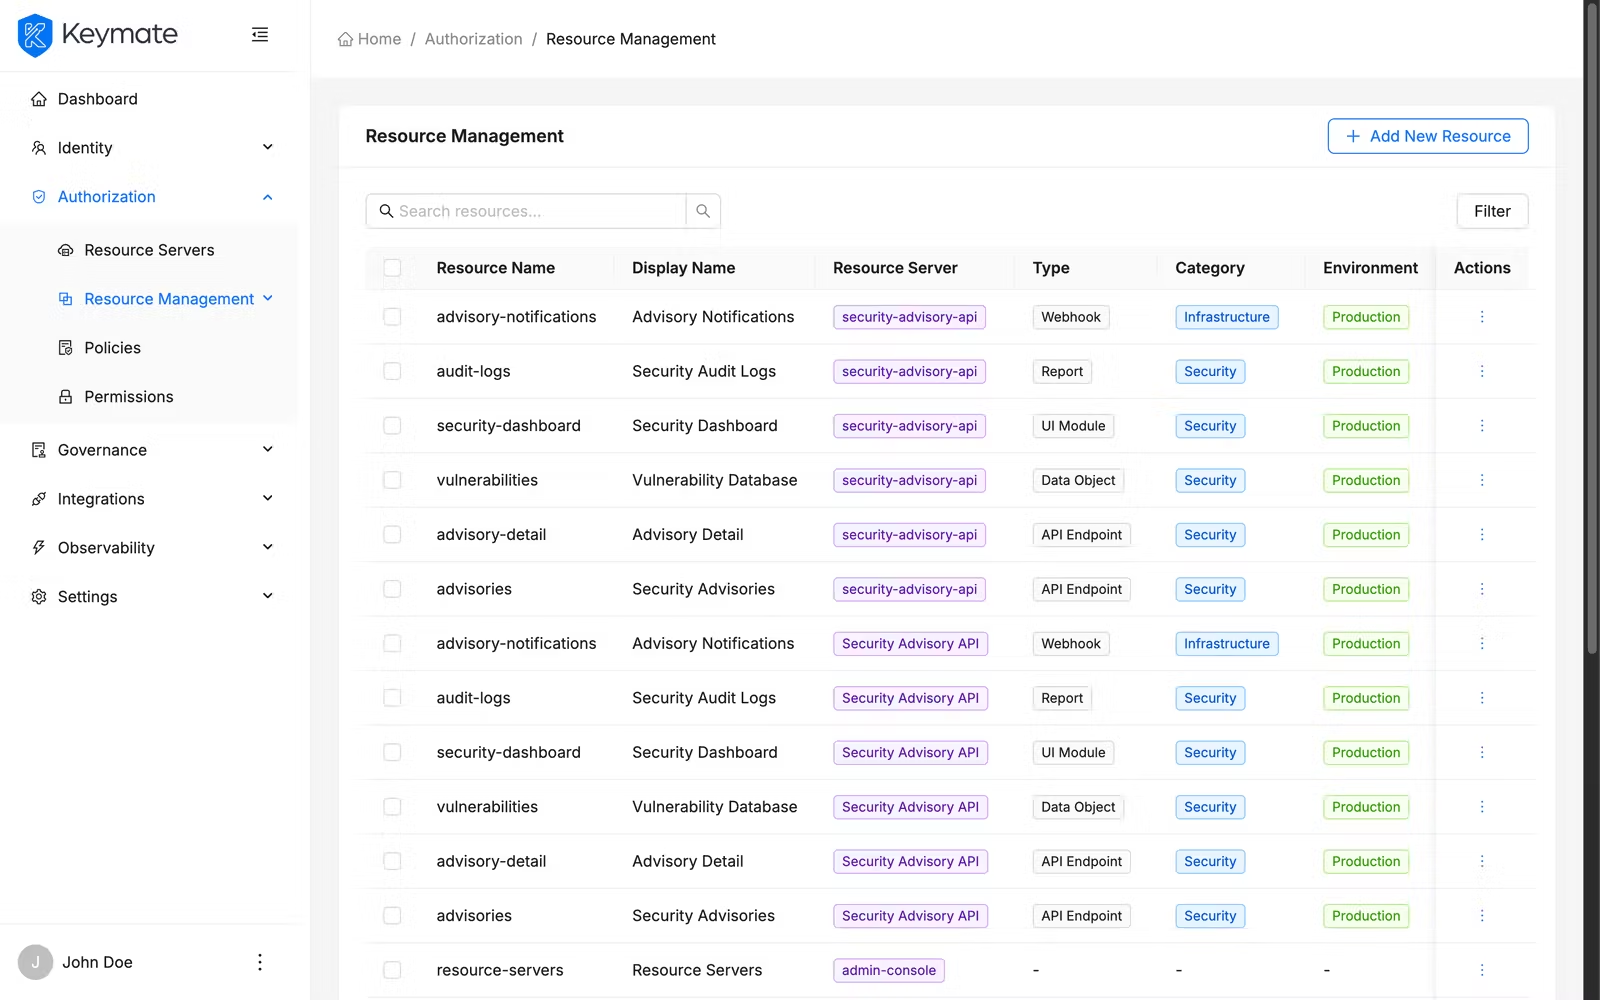
The table shows the following columns:
| Column | Description |
|---|---|
| Name | Resource name (links to the resource detail page) |
| Display Name | Alternative display name for the resource (if set) |
| Resource Server | Name of the parent resource server |
| Type | Resource type label (e.g., HR Management) |
| Category | Resource category label (e.g., API Endpoint) |
| Environment | Environment tag — DEV, TEST, or PROD |
| Status | Status badge — ACTIVE, INACTIVE, DISABLED, or DEPRECATED |
| Linked Permissions | Count of permissions associated with this resource |
| Created At | Creation timestamp |
| Created By | Username of the creator |
| Updated At | Last update timestamp |
| Updated By | Username of the last editor |
Use the search bar above the table to filter resources by name. Click the Filters button to open the filter panel, where you can narrow results by Resource Server, Type, Category, Status, and Environment.

Select multiple rows using the checkboxes to enable bulk actions such as bulk delete.
2. Create a New Resource
Click the Create Resource button in the top-right corner of the resource list page. This opens the resource creation wizard — a three-step guided flow.
Step 1 — Basic Information
The first step collects general resource properties.
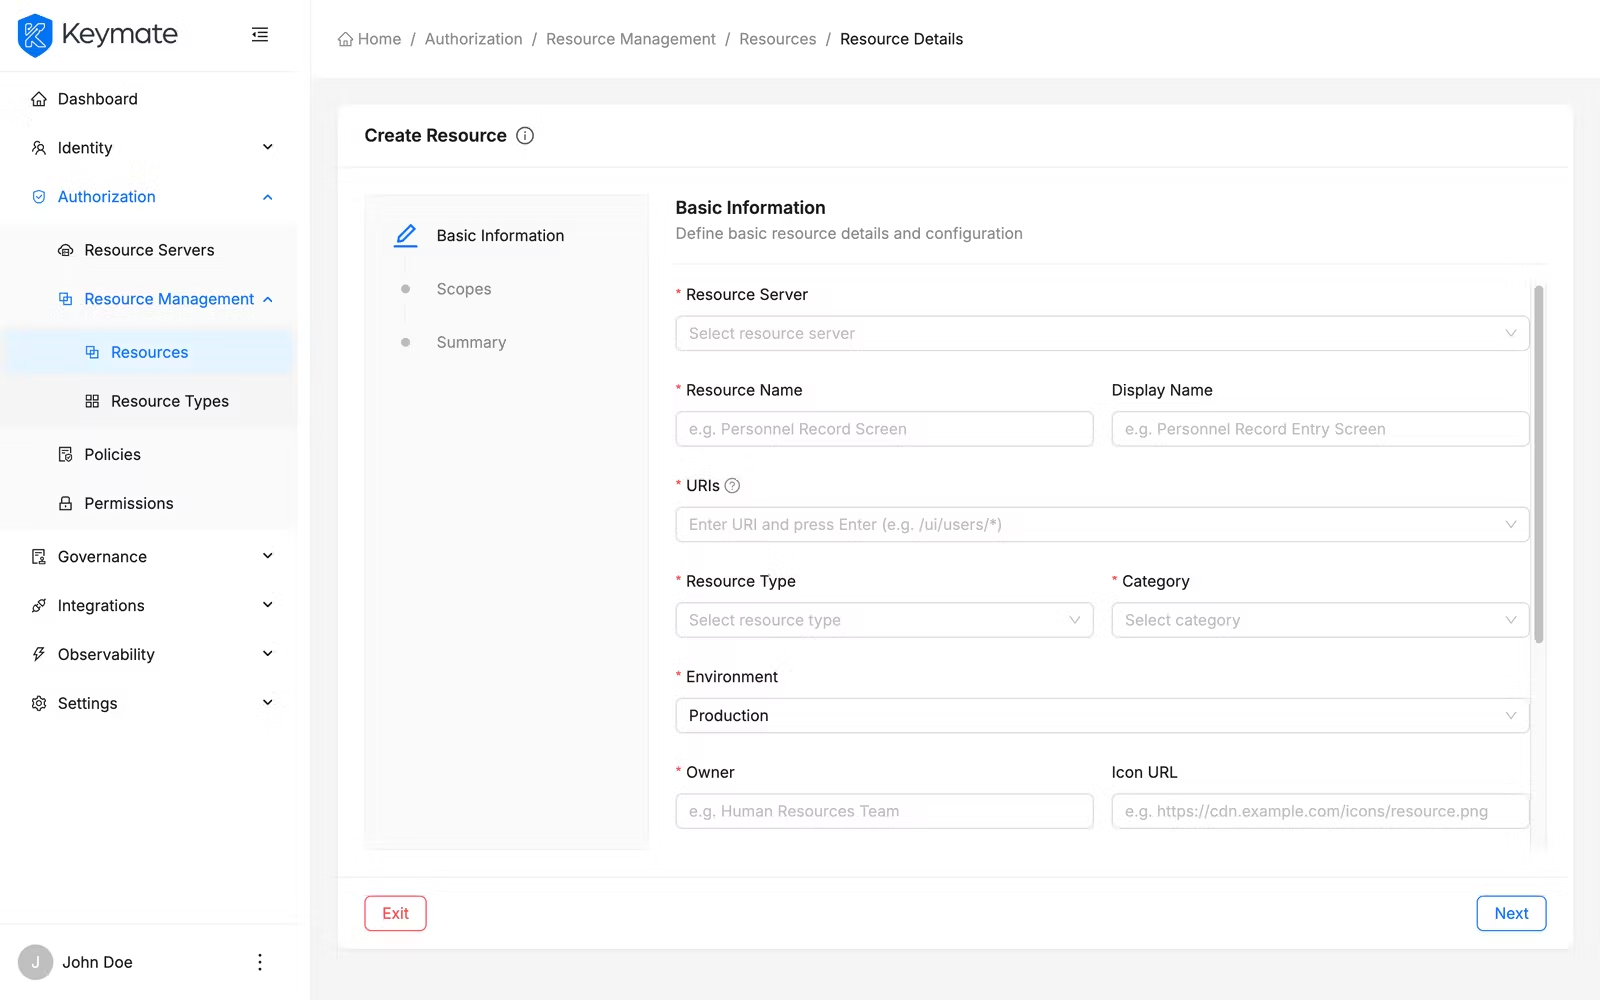
| Field | Required | Description |
|---|---|---|
| Resource Server | Yes | Select the resource server this resource belongs to. The available resource servers are searchable. This field is disabled in edit mode — resources cannot be moved between resource servers after creation. Changing the resource server resets the scopes selection |
| Name | Yes | A unique name for the resource (max 150 characters) |
| Display Name | No | An alternative human-readable name (max 150 characters) |
| URIs | Yes | One or more URI patterns that this resource represents. Supports path segments (/api/v1/employees), wildcards (/api/v1/users/*, /menu/**), and path parameters (/api/v1/employees/{employeeId}). Max 500 characters each. Enter URIs separated by comma or space |
| Type | Yes | Select a resource type from the searchable dropdown. Types categorize resources by functional domain |
| Category | Yes | Select a resource category from the searchable dropdown. Categories classify resources by technical nature |
| Environment | Yes | Dropdown — DEV, TEST, or PROD |
| Owner | Yes | The owner's username or identifier. The owner can manage access when owner-managed access is enabled |
| Icon URI | No | URL pointing to an icon representing the resource |
| Tags | No | Keyword tags for organizing and filtering resources (max 10 tags, max 50 characters each) |
| Description | No | Free-text description explaining the resource's purpose (max 1,000 characters) |
| Status | Yes | Toggle — ACTIVE or DISABLED. Defaults to ACTIVE |
| Owner Managed Access | No | Toggle — when enabled, the resource owner can manage access to this resource. Defaults to off |
For this example, select Acme HR as the resource server, enter Employee Records API as the name, add /api/v1/employees/* as the URI, select HR Management as the type and API Endpoint as the category, enter admin@example.com as the owner, choose PROD as the environment, and keep the status as ACTIVE.
URI patterns support wildcard syntax. Use * to match a single path segment and ** to match any number of segments. Use {paramName} for path parameters.
Click Next to proceed to step 2.
Step 2 — Scopes
The second step lets you associate scopes with the resource. Scopes define the actions available on the resource (for example, read, write, delete). The available scopes are loaded from the resource server you selected in Step 1.

| Field | Required | Description |
|---|---|---|
| Scopes | No | Multi-select — choose the scopes this resource supports. Options come from the resource server's scope definitions |
This step is optional. You can associate scopes later by editing the resource.
Click Next to proceed to step 3.
Step 3 — Summary
The third step presents a read-only review of all configuration before submission.

Review all details. The summary displays all configuration grouped into collapsible panels for General Info and Scopes. If any required fields are missing, an error alert appears at the top of the summary. Click Finish to create the resource. On success, you are redirected to the resource list page. Click Previous to return to earlier steps if you need to make changes. Click Exit to discard the wizard and return to the resource list without creating anything.
3. View Resource Details
From the resource list, click a resource Name to open its detail page. The detail page displays the resource name (or display name if set) as the page title and organizes information across two tabs.
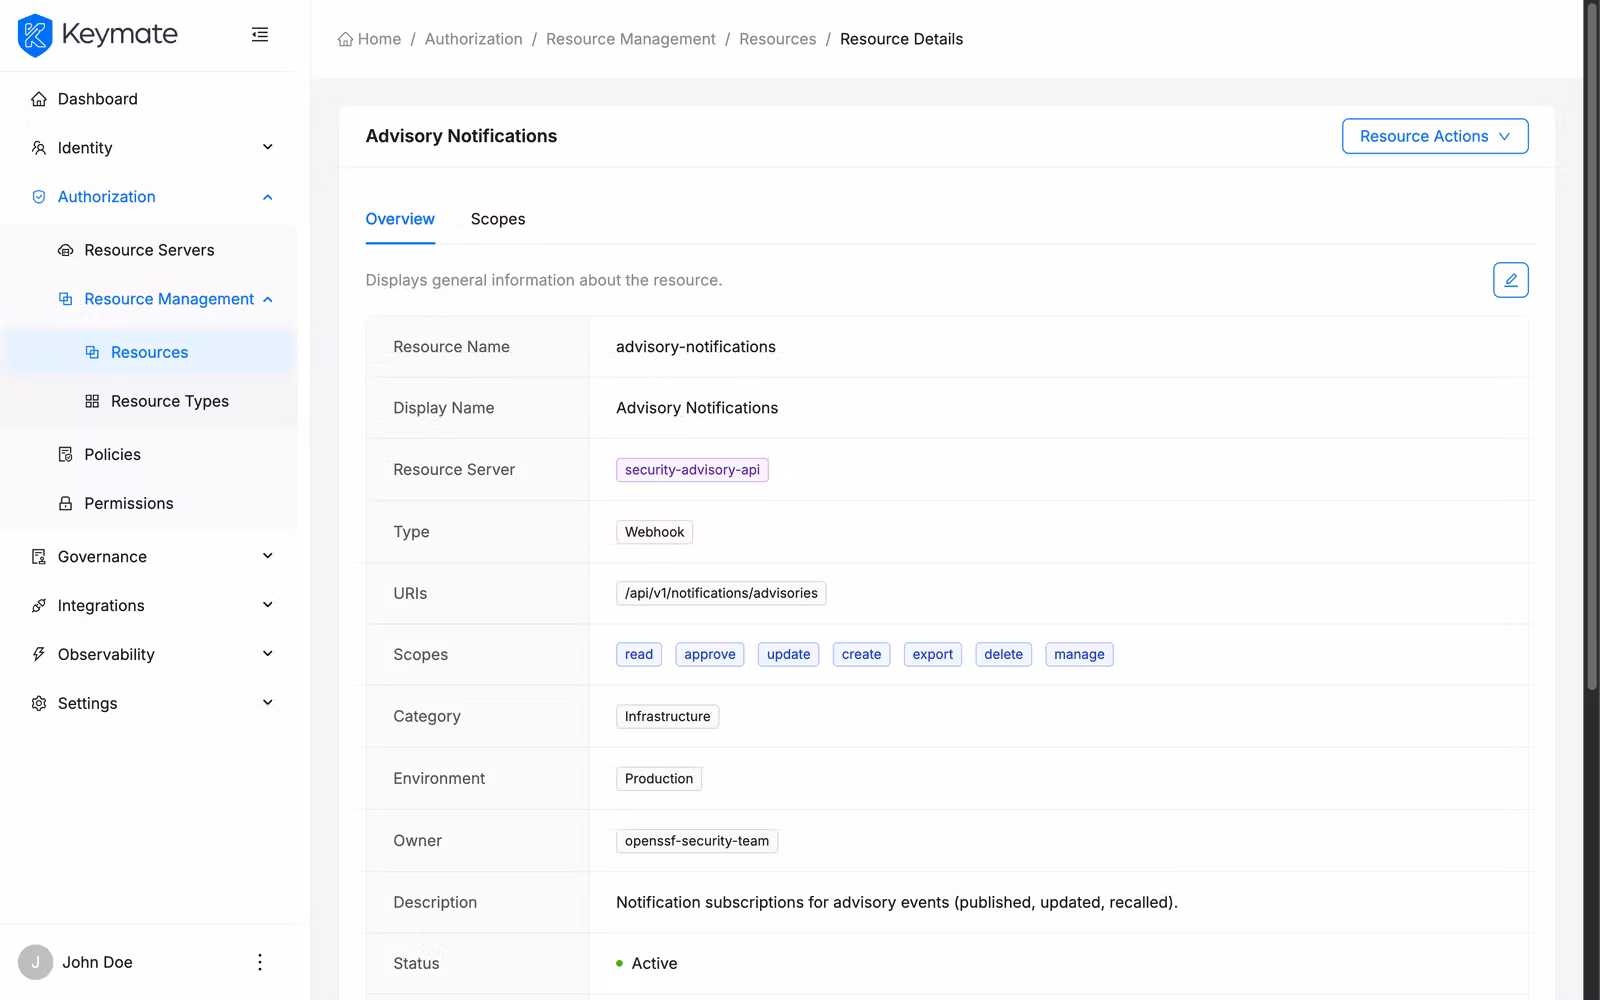
Overview Tab
The overview tab presents resource properties in a bordered description layout. Properties that have no value are hidden automatically.
| Property | Display |
|---|---|
| Name | Resource name |
| Display Name | Alternative display name (shown only if set and different from name) |
| Resource Server | Parent resource server client ID |
| Type | Resource type label |
| URIs | List of URI patterns displayed as tags |
| Scopes | Associated scopes displayed as tags (shown only if scopes are assigned) |
| Category | Resource category label |
| Environment | Environment tag — DEV, TEST, or PROD |
| Owner | Owner identifier |
| Description | Resource description text |
| Status | Status badge — ACTIVE or DISABLED |
| Owner Managed Access | Enabled or disabled badge |
| Tags | Keyword tags displayed as chips |
| Created At / By | Creation timestamp and user |
| Updated At / By | Last update timestamp and user |
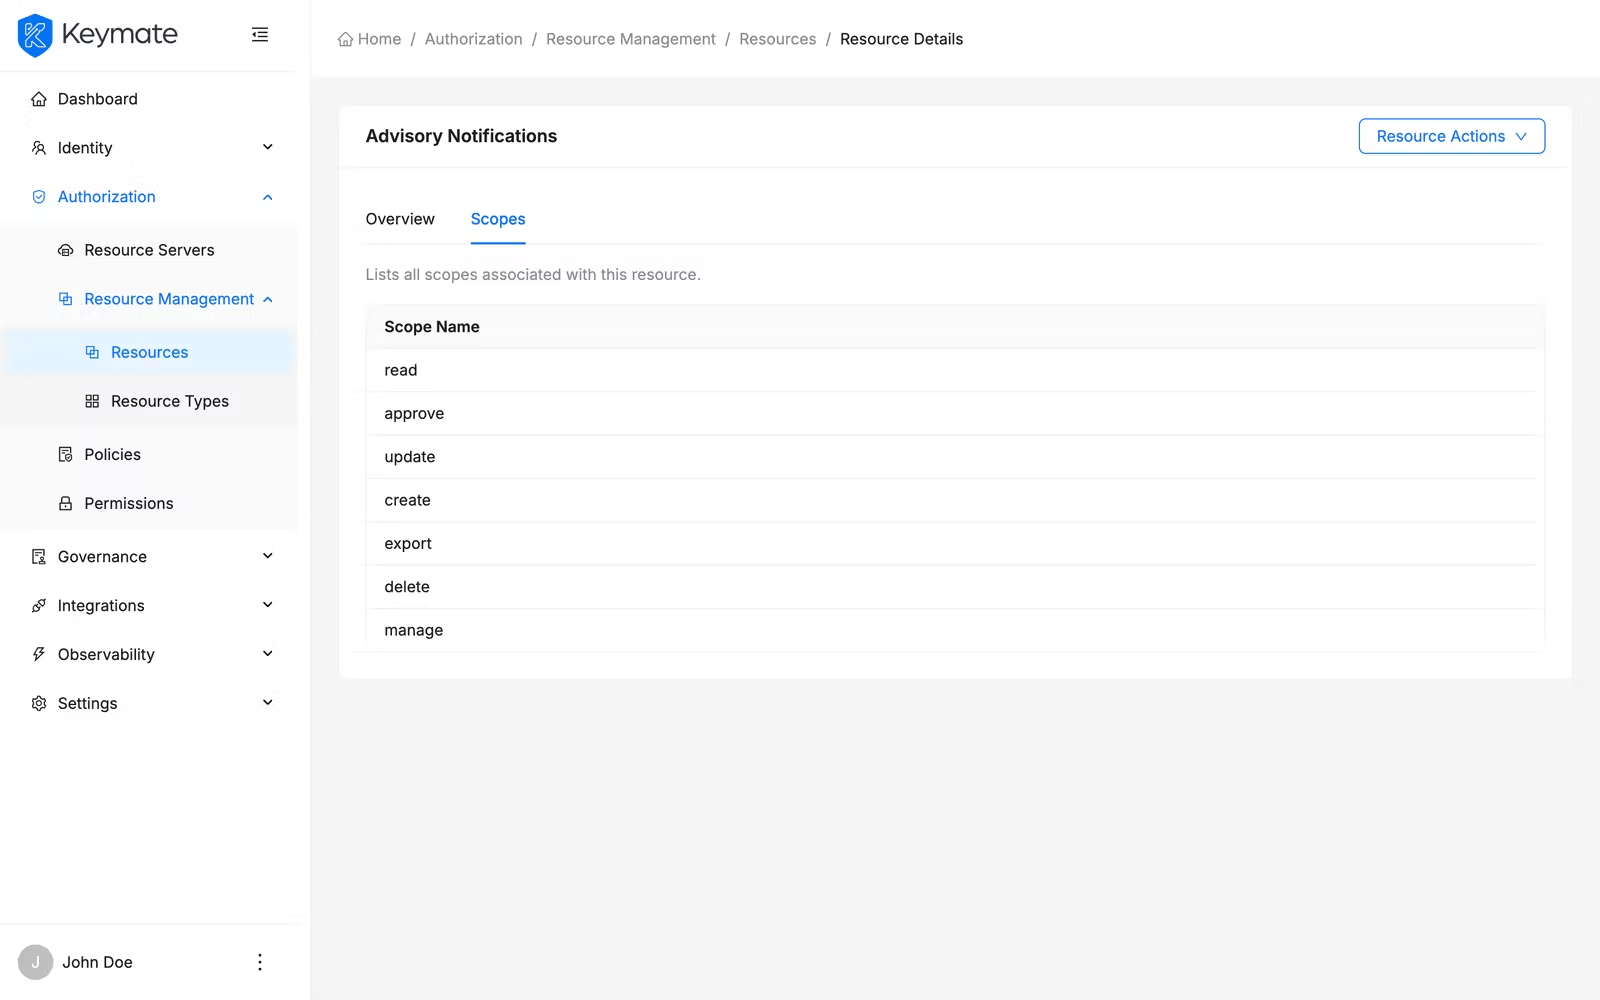
Scopes Tab
The scopes tab displays the scopes associated with this resource in a read-only list. Each scope shows its name, display name, and icon URI.
The detail page header provides two action buttons: Edit (pencil icon) and Delete (trash icon).
4. Edit a Resource
From the resource detail page, click the Edit button. An edit drawer opens from the right side with two tabs.

| Tab | Description |
|---|---|
| Basic Info | All resource properties — Name, Display Name, URIs, Type, Category, Owner, Owner Managed Access, Environment, Status, Description, Icon URI, Tags |
| Scopes | Scope association — add or remove scopes linked to this resource |
Modify the fields you need and click Submit to save your changes. On success, a confirmation toast appears and the detail page refreshes. Click Cancel to close the drawer without saving.
All fields are editable except the parent resource server. To move a resource to a different resource server, create a new resource on the target server and delete the old one.
5. Delete a Resource
You can delete resources individually or in bulk.
Single delete from the list: Click the row action menu (three dots) on any resource row and select Delete. A confirmation modal appears showing the resource name.
Single delete from the detail page: Click the Delete button (trash icon) in the page header. A confirmation modal appears.

Click Delete to confirm or Cancel to dismiss.
Bulk delete: Select multiple resources using the row checkboxes in the list table, then click the Delete button in the bulk action bar that appears above the table. A confirmation modal shows the count of selected resources.

Resource deletion is irreversible. Deleting a resource removes it from the resource server and breaks any permissions that reference it. If a resource is linked to active permissions, the bulk delete operation reports a partial failure — successfully deleted resources are removed while linked resources remain with an error message explaining the conflict.
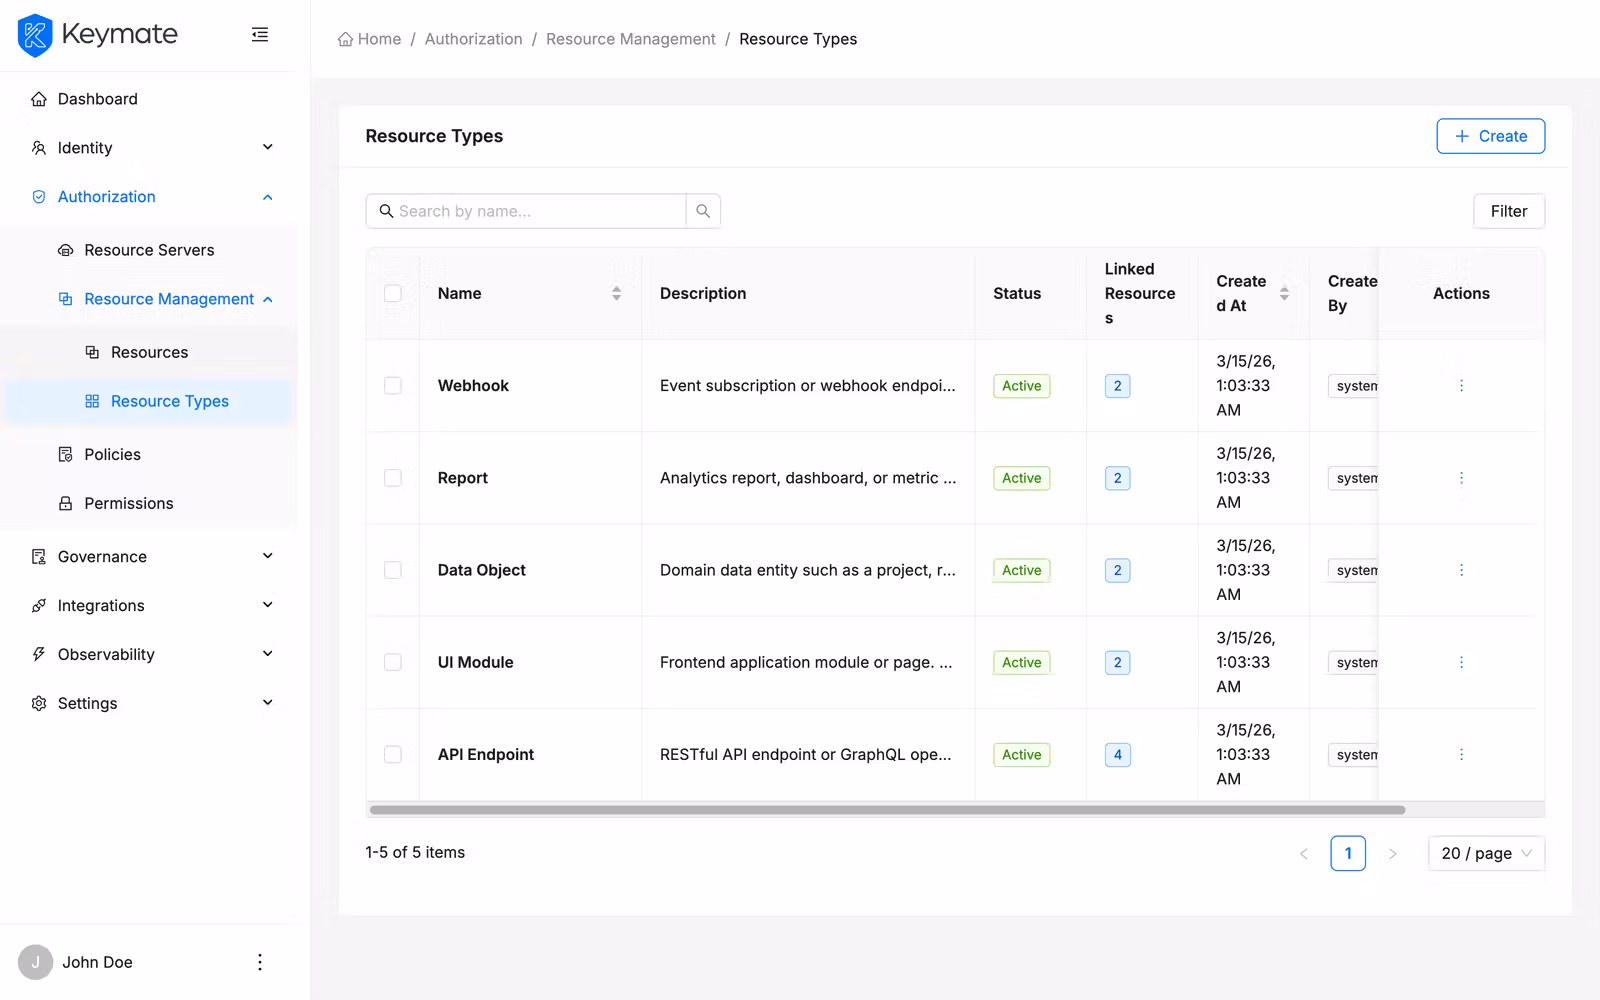
6. Manage Resource Types
Resource types categorize resources by functional domain. Navigate to Authorization > Resource Types to manage them.

The resource types list displays the following columns:
| Column | Description |
|---|---|
| Name | Resource type name |
| Description | Type description text |
| Status | Status badge — ACTIVE, DISABLED, INACTIVE, or DEPRECATED |
| Linked Resources | Count of resources using this type |
Create a resource type: Click the Create button and fill in the name, description, and status fields.
Edit a resource type: Click a type name to open the detail view, then use the Edit action.
Delete a resource type: Use the row action menu or the detail view delete action. A resource type with linked resources cannot be deleted until all resources using it are reassigned or removed.
7. Manage Resource Categories
Resource categories classify resources by their technical nature. Categories are managed at Authorization > Resource Categories (accessible through the resources management area).
The resource categories list displays the following columns:
| Column | Description |
|---|---|
| Name | Category name (e.g., API Endpoint, Transactional UI) |
| Description | Category description text |
| Status | Status badge — ACTIVE or DISABLED |
| Audit Enabled | Whether audit logging is enabled for resources in this category |
Create a resource category: Click the Create button and fill in the name, description, status, and audit enabled toggle.
Edit a resource category: Click a category name to open the detail view, then use the Edit action.
Delete a resource category: Use the row action menu or the detail view delete action. A category with linked resources cannot be deleted until all resources using it are reassigned or removed.
Validation Scenario
Scenario
Create a resource named Employee Records API on the Acme HR resource server with the URI /api/v1/employees/*, type HR Management, category API Endpoint, owner admin@example.com, environment PROD, and status ACTIVE. Associate the read and write scopes with the resource.
Expected Result
The resource appears in the global resource list with environment PROD and status ACTIVE. The detail page shows the URI /api/v1/employees/*, and the Scopes tab lists the read and write scopes.
How to Verify
- UI evidence: Navigate to Authorization > Resources and confirm the resource row shows the name Employee Records API with environment PROD and status ACTIVE. Click the name to open the detail page and verify the URIs field shows
/api/v1/employees/*. Switch to the Scopes tab and confirmreadandwritescopes are listed. - API evidence: Query the resource server's resource endpoint to confirm the resource exists with the expected name, environment, and status.
- Logs / traces: Check the Admin Console browser console (Network tab) for a successful
POSTresponse when creating the resource, andGETresponses with HTTP 200 when loading the list and detail pages. - Audit evidence: Review the audit log for resource creation events.
Troubleshooting
- Create Resource button is not visible — Your account lacks the Create scope on the Resources resource. Contact your platform administrator to assign the required permission.
- Resource list is empty despite having resources — Check the active filters. The search bar and filter panel may be narrowing results to a subset that excludes your resources. Clear all filters and try again.
- Type or Category dropdown shows no options — No resource types or categories have been created yet. Create them first under Authorization > Resource Types or through the resource categories management page before creating resources.
- URI validation fails — Ensure your URI starts with
/and uses only allowed characters: letters, digits, underscores, hyphens, dots, colons, forward slashes, curly braces, and asterisks. - Cannot change the resource server in the edit drawer — Resources are permanently bound to their resource server. Create a new resource on the target resource server and delete the old one.
- Bulk delete partially fails — Some resources may fail to delete if they are linked to active permissions. The result notification shows the count of successful and failed deletions with error details for each failure. Unlink or delete the referencing permissions first, then retry the delete.
- Scopes tab shows no scopes — Scopes are defined at the resource server level. Verify the parent resource server has scopes configured, then edit the resource to associate the desired scopes.
- Delete button is not visible — Your account lacks the Delete scope on the Resources resource.
- Cannot delete a resource type or category — The type or category has linked resources. Reassign or delete the linked resources before deleting the type or category.
Next Steps
After creating and configuring resources, you typically:
- Manage permissions to bind policies to your resources and scopes
- Manage policies to define the authorization rules that govern access to your resources
- Simulate authorization decisions to verify that resources are protected as expected
- Review decision traces to debug how resource access decisions are made
Related Docs
Permission Management
Create permissions that bind policies to resources and scopes
Policy Management
Define authorization rules evaluated against resource access requests
Resource Model
Conceptual model for how resources are represented in the platform
Scope Model
Understand how scopes define available actions on resources
Admin Console Overview
Introduction to the Admin Console and its core workflows
Authorization Models
Understand RBAC, ABAC, ReBAC, and PBAC concepts