Permissions
Permission management in the Admin Console lets you create, browse, edit, and delete permissions that bind policies to resources and scopes on a resource server. Permissions are the bridge between "who is allowed" (policies) and "what is protected" (resources and scopes) — they determine whether a specific set of policies grants or denies access to a specific set of protected items.
Every permission is scoped to a single resource server and configured as one of two types:
- Scope-based — protects specific scopes (actions) defined on the resource server
- Resource-based — protects specific resources registered on the resource server
This guide walks through the full permission lifecycle: browsing the permission list, creating permissions with the wizard, viewing permission details, editing existing permissions, and deleting permissions you no longer need.
Goal
Create and manage permissions that bind policies to resources and scopes. By the end of this guide you will know how to browse permissions for a resource server, create scope-based and resource-based permissions using the wizard, view permission details, edit existing permissions, and delete permissions individually or in bulk.
Audience
Platform engineers, developers, and architects who need to manage authorization permissions through the Admin Console UI.
Prerequisites
- Access to a running Admin Console instance
- At least one resource server configured with resources or scopes
- Your account has the required permissions for the operations you need to perform:
- Read scope on the Resource Servers resource — to view the permission list and details
- Create scope on the Resource Servers resource — to create new permissions
- Update scope on the Resource Servers resource — to edit existing permissions
- Delete scope on the Resource Servers resource — to delete permissions
The Admin Console enforces permission gates on every action. Buttons and menu items for operations you lack permissions for are hidden automatically.
Before You Start
| Sidebar Path | Destination |
|---|---|
| Authorization > Permissions | Permission list page |
- Understand the difference between scope-based and resource-based permissions. A scope-based permission protects specific actions (such as
read,write,delete) defined on the resource server. A resource-based permission protects specific named resources registered on the resource server. - Ensure you have created the policies you want to associate with your permissions. Permissions reference existing policies — you select them during creation.
- Ensure your resource server has the resources or scopes you want to protect. The available options in the permission form are loaded from the selected resource server.
Worked Example
Throughout this guide, we use a fictional scope-based permission named Acme Document Read that grants read access to documents in the Acme API resource server. The permission links the read scope to an existing policy named Editor Role Policy using a Unanimous decision strategy. You can replace these values with your own permission details.
Steps
1. Navigate to the Permission List
Open the Admin Console and go to Authorization > Permissions. The permission list page displays a Resource Server dropdown at the top of the page. You must select a resource server before the permission table becomes visible.
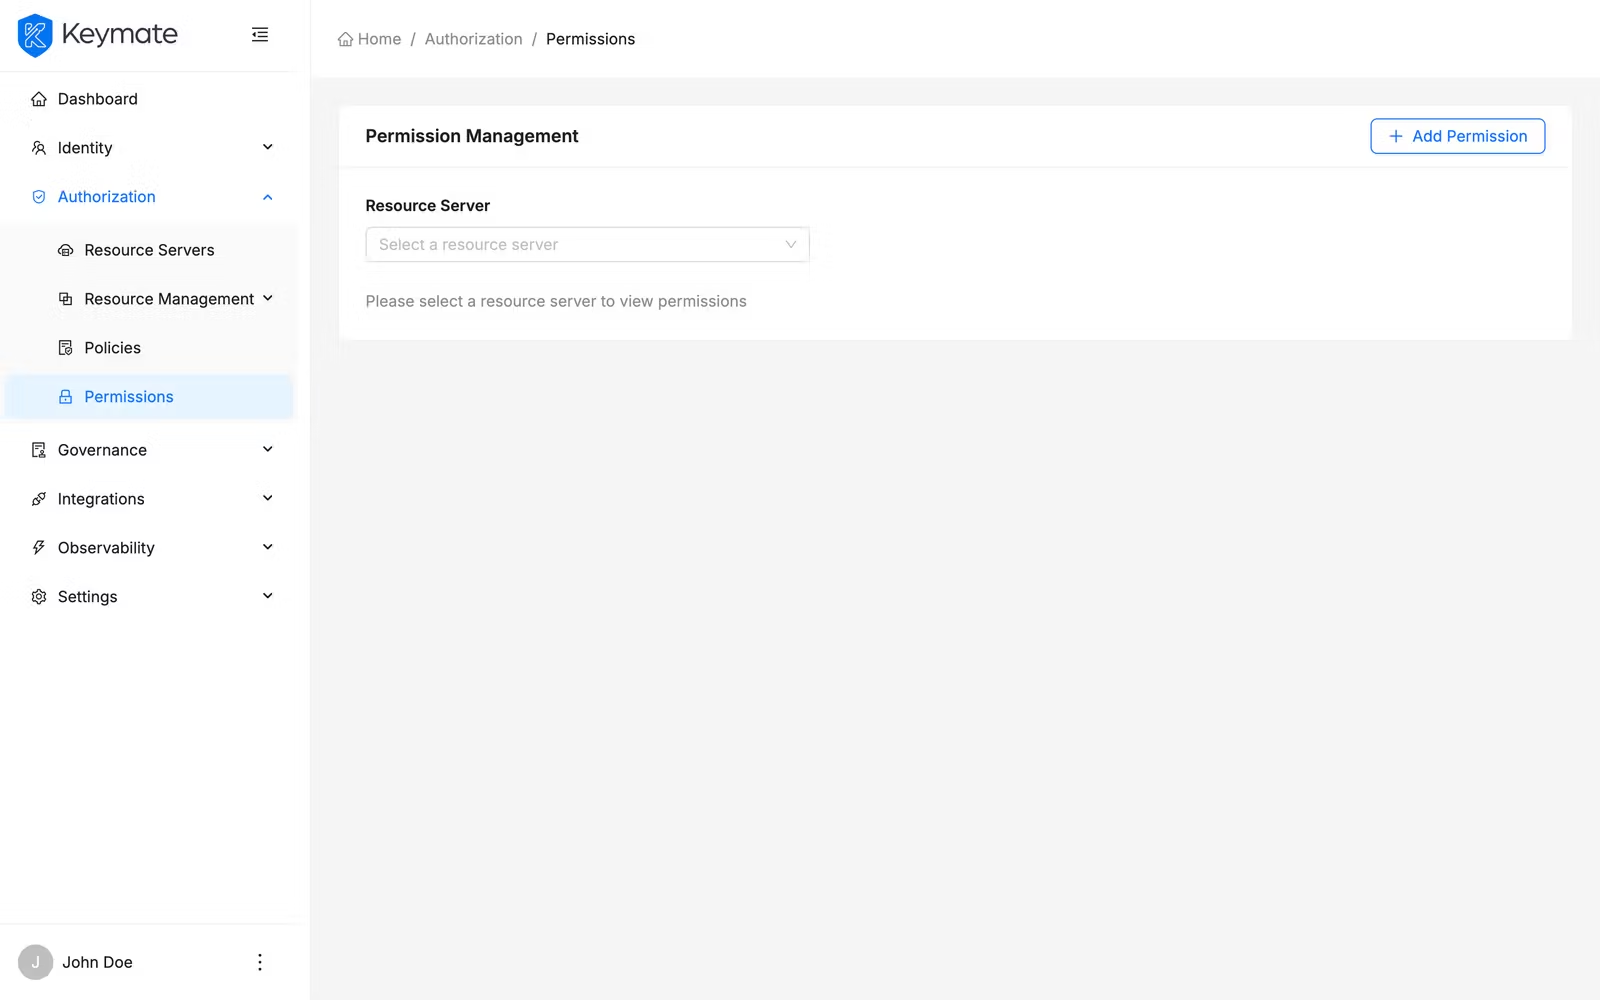
Select a resource server from the dropdown. Use the search field in the dropdown to find a resource server by name. Once a resource server is selected, the permission table appears below.
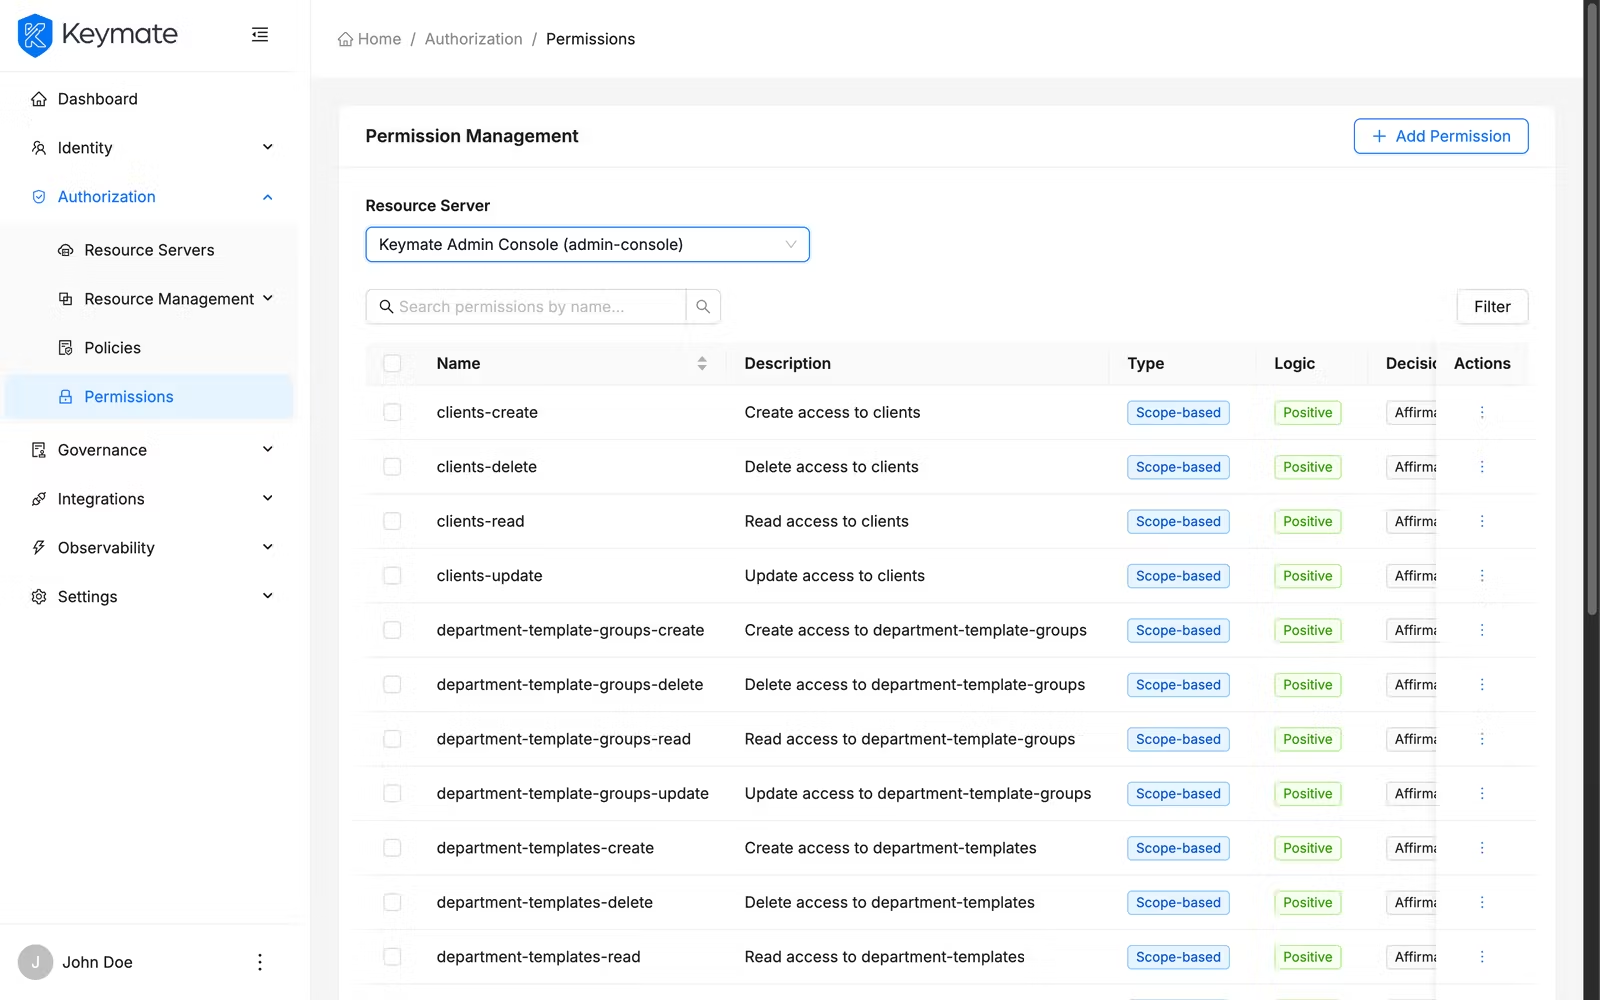
The table shows the following columns:
| Column | Description |
|---|---|
| Name | Permission name (links to the permission detail page) |
| Description | Permission description text (truncated with ellipsis for long values) |
| Type | Permission type displayed as a color-coded tag — blue for Scope-based, green for Resource-based |
| Logic | Evaluation logic — green tag for Positive, red tag for Negative |
| Decision Strategy | Strategy label — Affirmative, Unanimous, or Consensus |
Use the search bar above the table to filter permissions by name. Click the Filters button to open the filter panel, where you can narrow results by Type (Scope or Resource).
Select multiple rows using the checkboxes to enable bulk actions such as bulk delete.
2. Create a New Permission
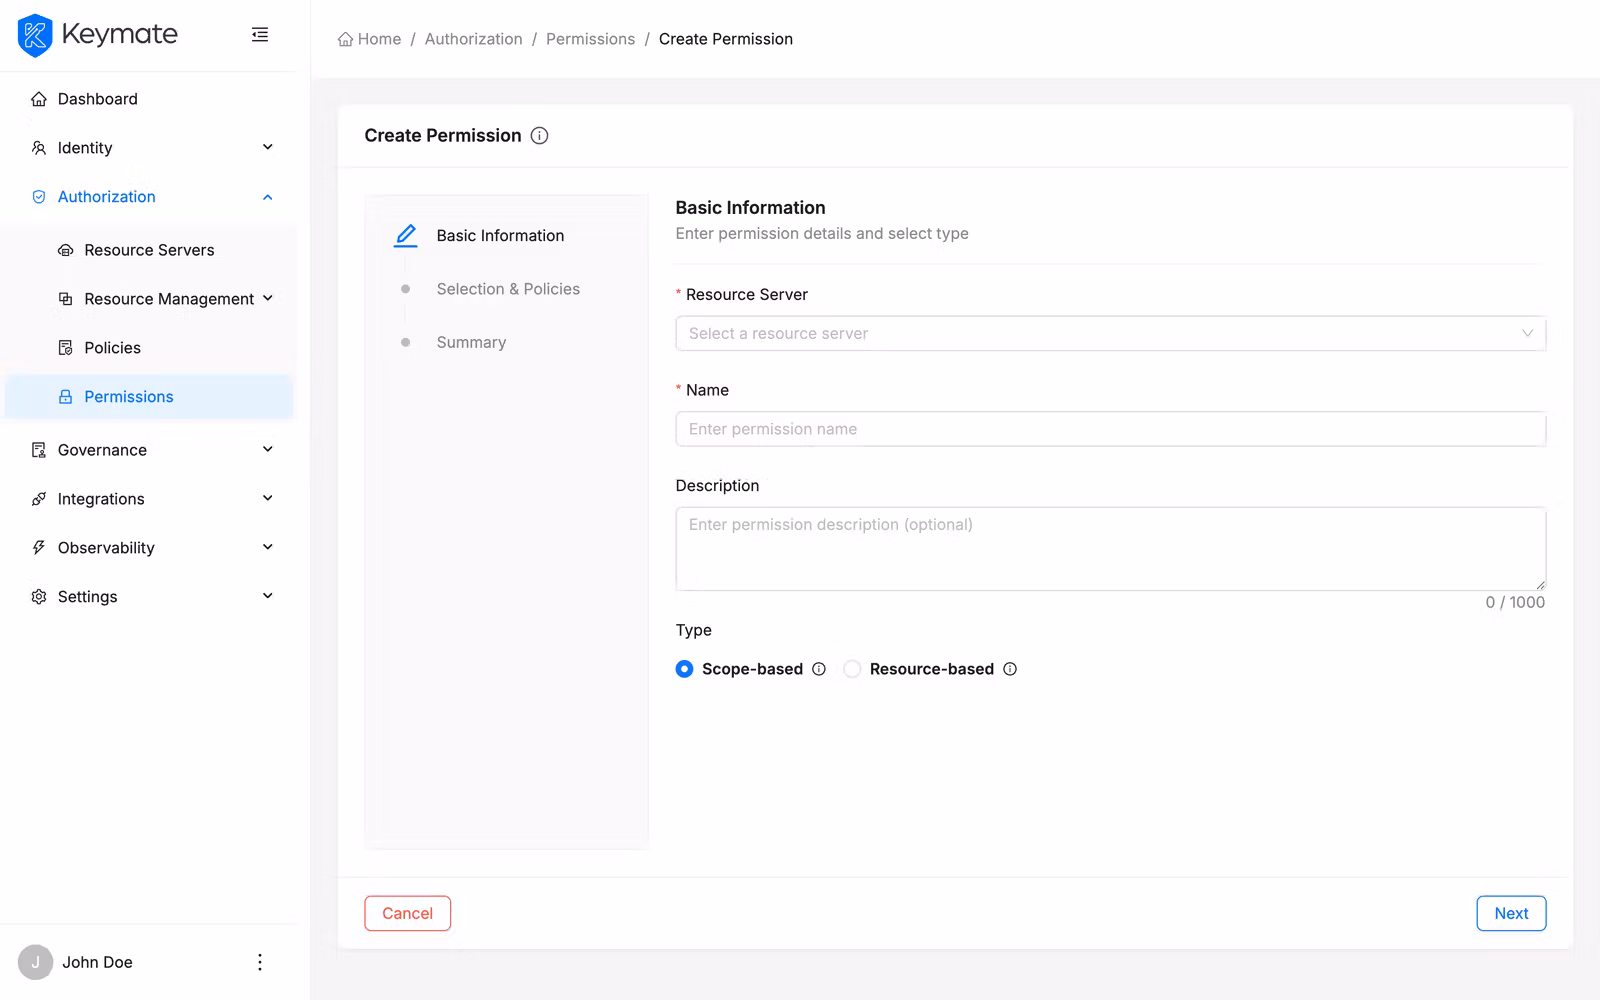
Click the Add Permission button in the top-right corner of the permission list page. This navigates to the permission creation wizard — a three-step guided flow.
If you already have a resource server selected on the list page, the wizard pre-selects that resource server automatically.
Step 1 — Basic Information
The first step collects general permission properties.

| Field | Required | Description |
|---|---|---|
| Resource Server | Yes | Select the resource server this permission belongs to. Searchable dropdown with server-side search. Changing the resource server resets all dependent selections (resources, scopes, policies) |
| Name | Yes | A unique name for the permission (max 150 characters) |
| Description | No | Free-text description explaining the permission's purpose (max 1,000 characters, character count displayed) |
| Type | Yes | Radio group — Scope (protects specific scopes) or Resource (protects specific resources). Each option includes an info tooltip with a detailed explanation. Defaults to Scope |
The permission type cannot be changed after creation. Choose carefully between Scope and Resource based on what you want to protect.
Click Next to proceed to step 2.
Step 2 — Selection and Policies
The second step presents dynamic fields based on the permission type selected in step 1, plus policy association and decision strategy configuration.
For scope-based permissions:

| Field | Required | Description |
|---|---|---|
| Scopes | No | Multi-select with search — select the scopes this permission protects. Options are loaded from the selected resource server |
For resource-based permissions:

| Field | Required | Description |
|---|---|---|
| Resources | No | Multi-select with search — select the resources this permission protects. Options are loaded from the selected resource server |
Common fields (both types):
| Field | Required | Description |
|---|---|---|
| Policies | No | Multi-select with search — select the policies to associate with this permission. Options include all policies available on the resource server |
| Decision Strategy | Yes | Radio group with detailed descriptions and tooltips (see below). Defaults to Unanimous |
The decision strategy determines how multiple associated policies are evaluated together:
| Strategy | Description |
|---|---|
| Affirmative | Access is granted if at least one associated policy permits it |
| Unanimous | Access is granted only if all associated policies permit it |
| Consensus | Access is granted if more policies permit than deny. If there is a tie, the final decision is negative |
Click Next to proceed to step 3.
Step 3 — Summary
The third step presents a read-only review of all configuration before submission.
Review all details. Click Create Permission to submit. On success, you are redirected to the permission list page. Click Previous to return to earlier steps if you need to make changes. Click Cancel to discard the wizard and return to the permission list without creating anything.
3. View Permission Details
From the permission list, click a permission Name to open its detail page. The detail page displays the permission name as the page title and shows all configuration on the Overview tab.

The overview tab presents permission properties in a bordered description layout:
| Property | Display |
|---|---|
| Name | Permission name |
| Description | Permission description (if provided) |
| Type | Color-coded tag — blue for Scope-based, green for Resource-based |
| Logic | Status badge — green dot for Positive, red dot for Negative |
| Decision Strategy | Tag showing the strategy name |
| Scopes | Blue tags for each selected scope (scope-based permissions only). Shows "No scopes selected" if empty |
| Resources | Green tags for each selected resource (resource-based permissions only). Shows "No resources selected" if empty |
| Policies | Purple tags for each associated policy. Shows "No policies selected" if empty |
The detail page header provides two action buttons: Edit (pencil icon) and Delete (trash icon).
4. Edit a Permission
From the permission detail page, click the Edit button. An edit drawer opens from the right side with two tabs.

| Tab | Description |
|---|---|
| Basic Information | General properties — Resource Server (locked), Name, Description, Type (locked) |
| Selection & Policies | Scopes or Resources selection (depending on type), Policies association, Decision Strategy |
The Resource Server and Type fields are disabled in edit mode — you cannot change these properties after creation. All other fields are editable.
Modify the fields you need and click Submit to save your changes. On success, a confirmation toast appears and the detail page refreshes. Click Cancel to close the drawer without saving.
5. Delete a Permission
You can delete permissions individually or in bulk.
Single delete from the list: Open the row action menu on any permission row and select Delete. A confirmation modal appears showing the permission name.
Single delete from the detail page: Click the Delete button (trash icon) in the page header. A confirmation modal appears.

Click Delete to confirm or Cancel to dismiss.
Bulk delete: Select multiple permissions using the row checkboxes in the list table, then click the Delete button in the bulk action bar that appears above the table. A confirmation modal shows the count of selected permissions.

Permission deletion is irreversible. Deleting a permission removes the access control binding between its policies and the protected resources or scopes. Verify that the permission is not actively enforcing access decisions before deleting it.
Validation Scenario
Scenario
Create a scope-based permission named Acme Document Read on the Acme API resource server, associate it with the read scope and the Editor Role Policy, and verify the permission appears in the list and detail views.
Expected Result
The permission is created, visible in the permission list with type Scope-based (blue tag), and the detail page shows the read scope and Editor Role Policy as associated items.
How to Verify
- UI evidence: Navigate to Authorization > Permissions, select the Acme API resource server, and confirm the permission row shows the name Acme Document Read with type Scope-based (blue tag). Click the name to open the detail page and verify the Scopes field shows a blue
readtag and the Policies field shows a purple Editor Role Policy tag. - API evidence: Query the resource server's permission endpoint to confirm the permission exists with the expected type and name.
- Logs / traces: Check the Admin Console browser console (Network tab) for a successful
POSTresponse with HTTP 201 status when creating the permission, andGETresponses with HTTP 200 when loading the list and detail pages. - Audit evidence: Review the audit log for permission creation events.
Troubleshooting
- Permission table is not visible — You must select a Resource Server from the dropdown before the permission list appears. If no resource servers are listed, configure one first under resource server management.
- Create Permission button is not visible — Your account lacks the Create scope on the Resource Servers resource. Contact your platform administrator to assign the required permission.
- Scopes or Resources dropdown shows no options — The selected resource server has no scopes (for scope-based) or no resources (for resource-based) registered. Register scopes or resources on the resource server before creating a permission that references them.
- Policies dropdown shows no options — No policies exist on the selected resource server. Create policies through policy management before associating them with permissions.
- Type field is locked in the edit drawer — The permission type (Scope or Resource) cannot be changed after creation. To use a different type, create a new permission and delete the old one.
- Resource Server field is locked in the edit drawer — Permissions cannot be moved between resource servers. Create a new permission on the target resource server and delete the old one.
- Delete button is not visible — Your account lacks the Delete scope on the Resource Servers resource.
- Bulk delete partially fails — Some permissions may fail to delete if they are referenced by other configurations. The result toast shows the count of successful and failed deletions.
Next Steps
After creating and configuring permissions, you typically:
- Manage policies to create the authorization rules that your permissions reference
- Manage resources to register the resources and scopes your permissions protect
- Simulate authorization decisions to verify your permissions behave as expected with the linked policies
- Review decision traces to debug how permissions contribute to access decisions
Related Docs
Policy Management
Create and assign policies that permissions reference for access decisions
Resource Management
Register resources and scopes that permissions protect
Admin Console Overview
Introduction to the Admin Console and its core workflows
User & Role Management
Manage users and roles that policies evaluate
Decision Simulation
Test and verify permission evaluation results
Authorization Models
Understand RBAC, ABAC, ReBAC, and PBAC concepts