Attributes
Goal
Define user attribute schemas (attribute definitions) and assign attribute values to users in the Admin Console. By the end of this guide you will know how to create an attribute definition with the five-step wizard, configure validation, security, and display settings, manage definitions from the detail page, and assign attribute values to users.
Audience
Platform engineers and operators who configure the user data model — defining what custom attributes users can carry and how those attributes are validated, protected, and surfaced across the platform.
Prerequisites
- Access to the Admin Console with attribute management permissions (
CREATE,READ,UPDATE,DELETEscopes on the User Attributes resource) - At least one tenant configured if you plan to create tenant-scoped attribute definitions
- Familiarity with User & Role Management for assigning attribute values during user creation
Before You Start
Attribute management operates on two layers:
- Attribute Definitions — schema-level blueprints that describe what attributes can exist, their data types, validation rules, security controls, and visibility settings. Definitions can be global (available across all tenants) or tenant-scoped (restricted to a specific tenant).
- Attribute Values — actual data assigned to individual users. Each value references an attribute definition and carries a status (
ACTIVEorINACTIVE).
You manage definitions under Identity > Attributes > Attribute Definitions. You assign values to users from the user detail page or during user creation. Attribute definitions support eight data types:
| Type | Description |
|---|---|
| Text | Free-text input with optional pattern and length constraints |
| Number | Numeric input with optional min/max constraints |
| Yes/No | Toggle switch (true/false) |
| Date | Date picker |
| Select | Dropdown with a predefined list of allowed values |
| Email-formatted input | |
| Phone | Phone number input (international format) |
| File | File upload |
Worked Example
Throughout this guide, we create a global attribute definition called employee_id of type Text, mark it as required, set a regex pattern for validation, classify it as Internal, and configure it to appear in the user interface and admin panel. We then assign this attribute to a user from the user detail page.
Steps
1. Open the attribute definitions list
Navigate to Identity > Attributes > Attribute Definitions in the Admin Console sidebar. The list page displays all existing attribute definitions in a paginated table with the following columns:
| Column | Description |
|---|---|
| Code | Unique identifier for the attribute |
| Label (Turkish) | Turkish label text |
| Data Type | Data type (Text, Number, Yes/No, etc.) |
| Required Field | Whether the attribute is mandatory for users |
| Order | Display order position |
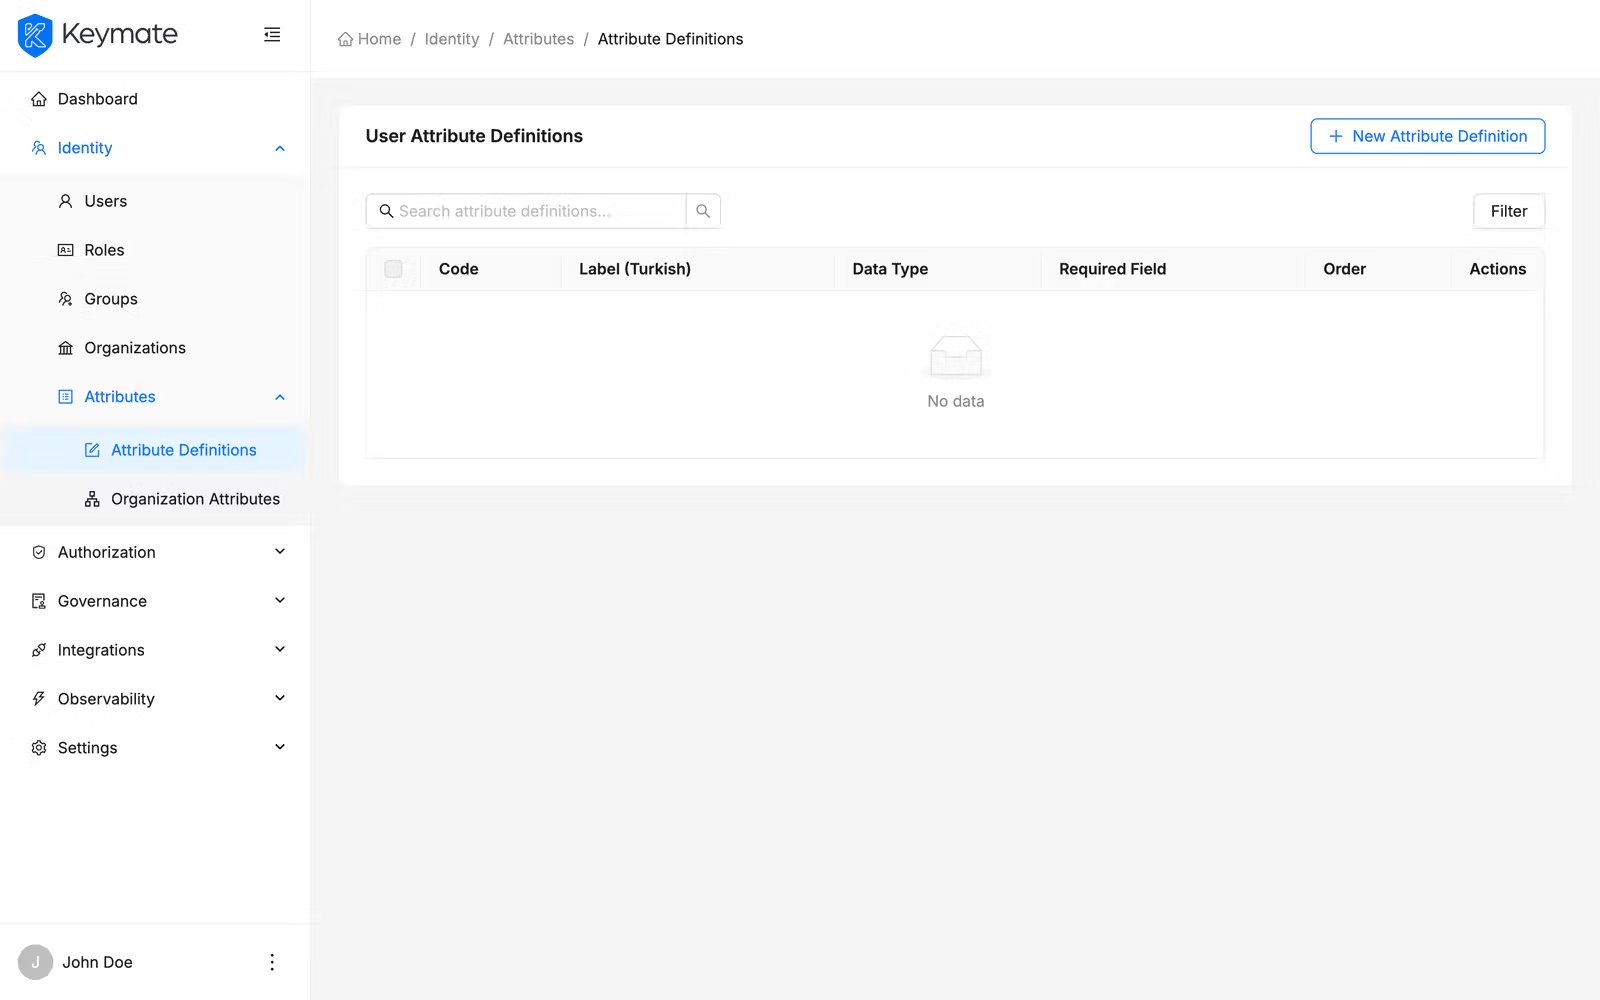
Use the search bar above the table to filter definitions by code, label (Turkish or English), data type, or source system. When no tenant filter is applied, the list shows global definitions. Select a tenant from the Tenant filter dropdown to view tenant-scoped definitions.
2. Start the create attribute definition wizard
Click the New Attribute Definition button in the top-right corner of the list page. This opens a five-step wizard that guides you through defining all aspects of the attribute.
The New Attribute Definition button is only visible if your account has the CREATE scope on the User Attributes resource.
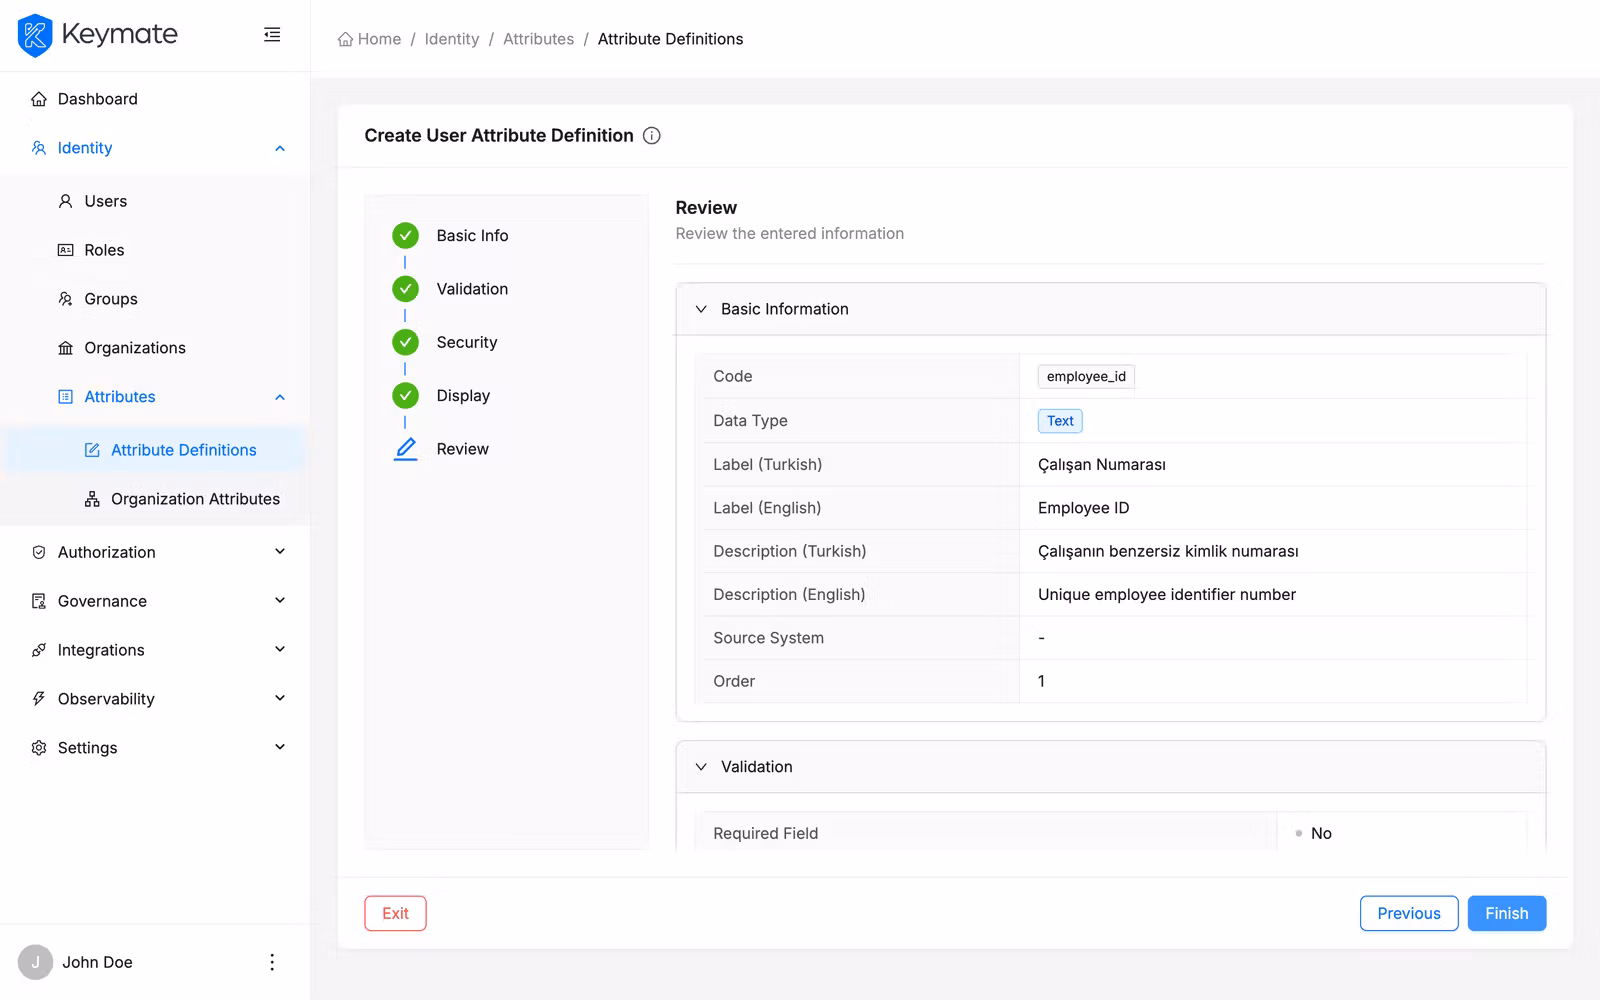
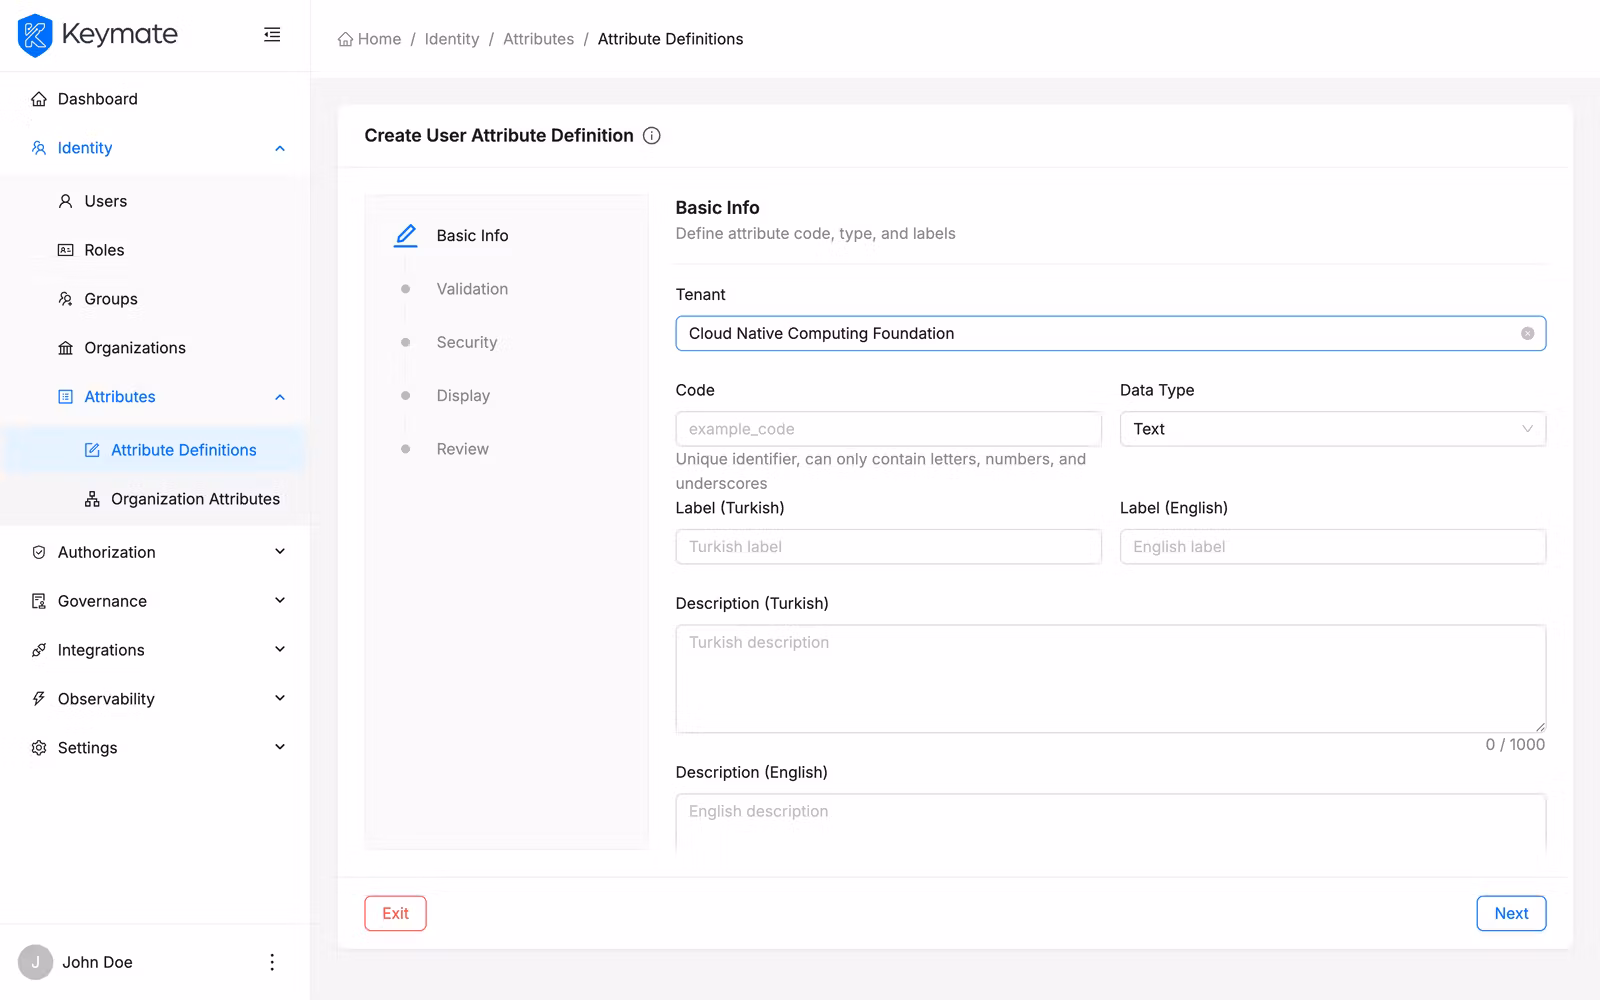
3. Enter basic information (Step 1 of 5)
Fill in the attribute identity and metadata:
| Field | Required | Description |
|---|---|---|
| Tenant | No | Select a tenant to scope this definition. Leave empty for a global definition |
| Code | Yes | Unique identifier. Must be at least 2 characters. Allowed characters: letters, digits, underscores, hyphens, periods, tildes (^[a-zA-Z0-9_\-.~]+$) |
| Data Type | Yes | Data type — select from: Text, Number, Yes/No, Date, Select, Email, Phone, File |
| Label (Turkish) | Yes | Turkish display label (minimum 2 characters) |
| Label (English) | Yes | English display label (minimum 2 characters) |
| Description (Turkish) | Yes | Turkish description text (maximum 1,000 characters) |
| Description (English) | Yes | English description text (maximum 1,000 characters) |
| Source System | No | Identifies the originating system (e.g., HRMS, SCIM, manual) |
| Order | Yes | Numeric display order for attribute forms |
For this example, enter employee_id as the code, select Text as the data type, and fill in the labels and descriptions in both languages. Set the order to 1.

Click Next to proceed to validation settings.
4. Configure validation rules (Step 2 of 5)
The validation step adapts its fields based on the data type selected in step 1.
For Text type:
| Field | Description |
|---|---|
| Format | Expected format hint (e.g., uuid, url) |
| Regex Pattern | Regex pattern for value validation (e.g., ^EMP-\d{6}$) |
| Minimum Length | Minimum character count |
| Maximum Length | Maximum character count |
For Number type:
| Field | Description |
|---|---|
| Minimum Length | Minimum numeric value allowed |
| Maximum Length | Maximum numeric value allowed |
The Admin Console labels these fields as Minimum Length and Maximum Length for all data types. For Number attributes, these fields control the minimum and maximum numeric value, not character length.
For Select type:
| Field | Description |
|---|---|
| Allowed Values | Tag input — type each allowed value and press Enter to add it |
Common toggles (all types):
| Toggle | Description |
|---|---|
| Required Field | When enabled, users must provide a value for this attribute |
| Can Be Deferred | Allows the attribute value to be collected later, not at initial creation |
| Required on Login | Prompts the user to provide or update this attribute value during login |
For this example, enable Required Field, enter ^EMP-\d{6}$ as the regex pattern, and set minimum length to 10 and maximum length to 10.
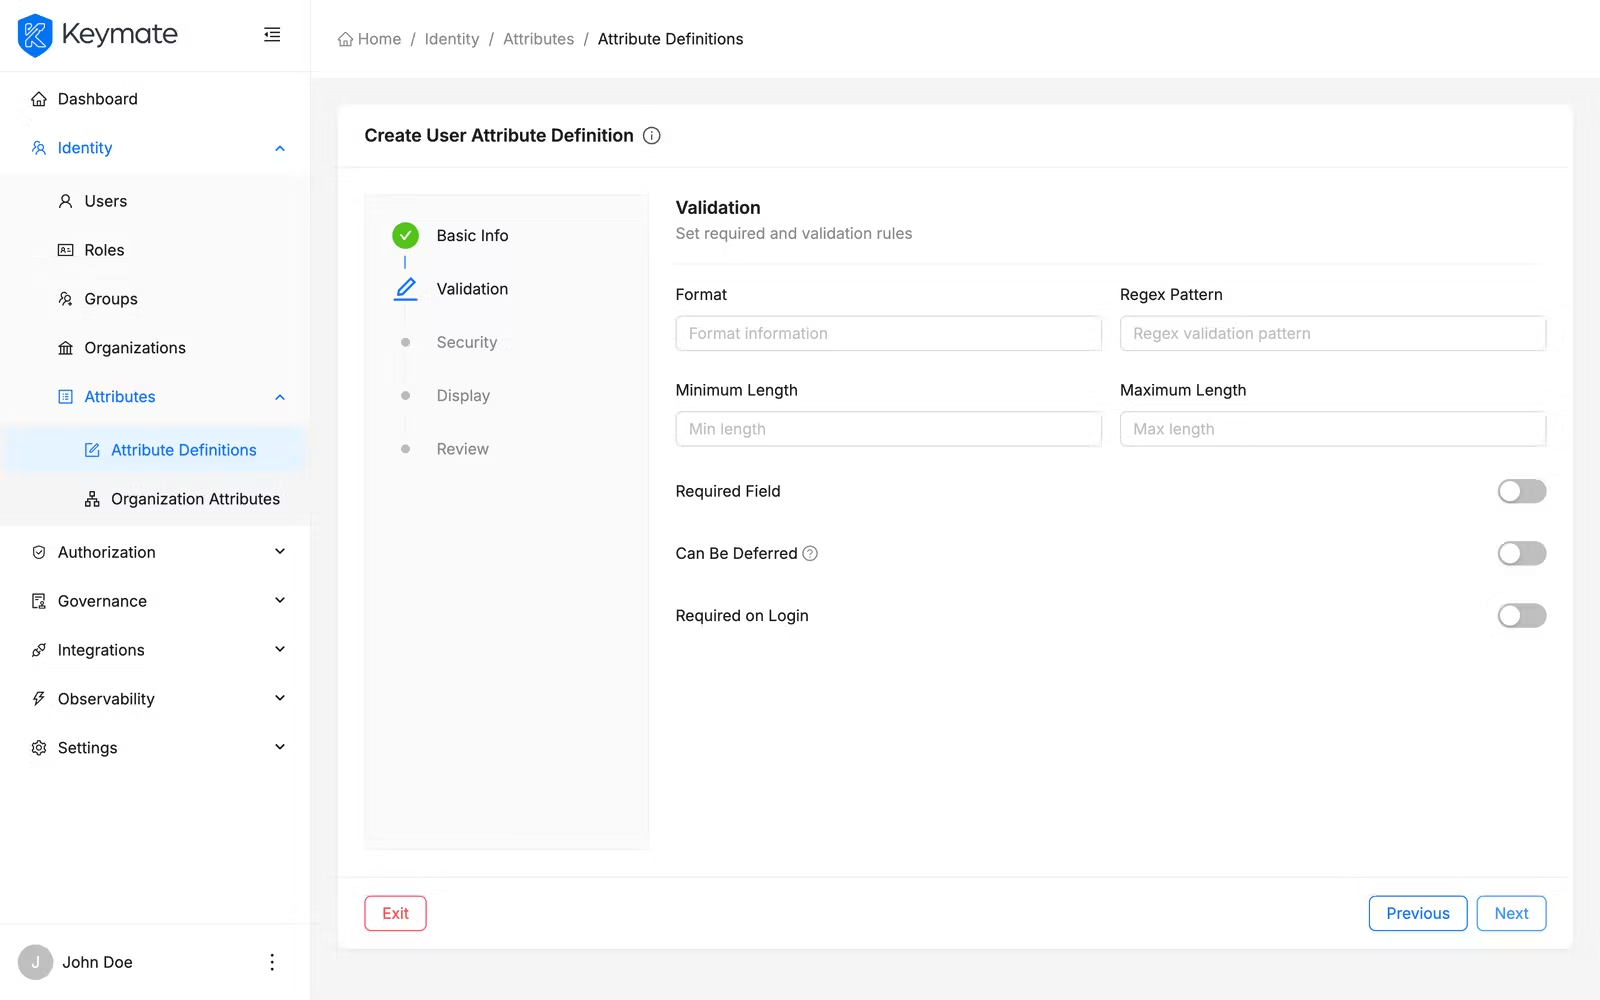
Click Next to proceed to security settings.
5. Configure security settings (Step 3 of 5)
Control how the attribute data is protected:
| Toggle / Field | Description |
|---|---|
| Sensitive Data | Marks the attribute as containing sensitive data |
| Mask in UI | Masks the attribute value in user-facing interfaces |
| Encrypt at Rest | Enables encryption for stored attribute values |
| Encrypt in Transit | Enables encryption during data transmission (enabled by default) |
| Data Classification | Classification level: Public, Internal, Confidential, or Restricted |
For this example, leave Sensitive Data and Mask in UI disabled, keep Encrypt in Transit enabled, and select Internal as the data classification.
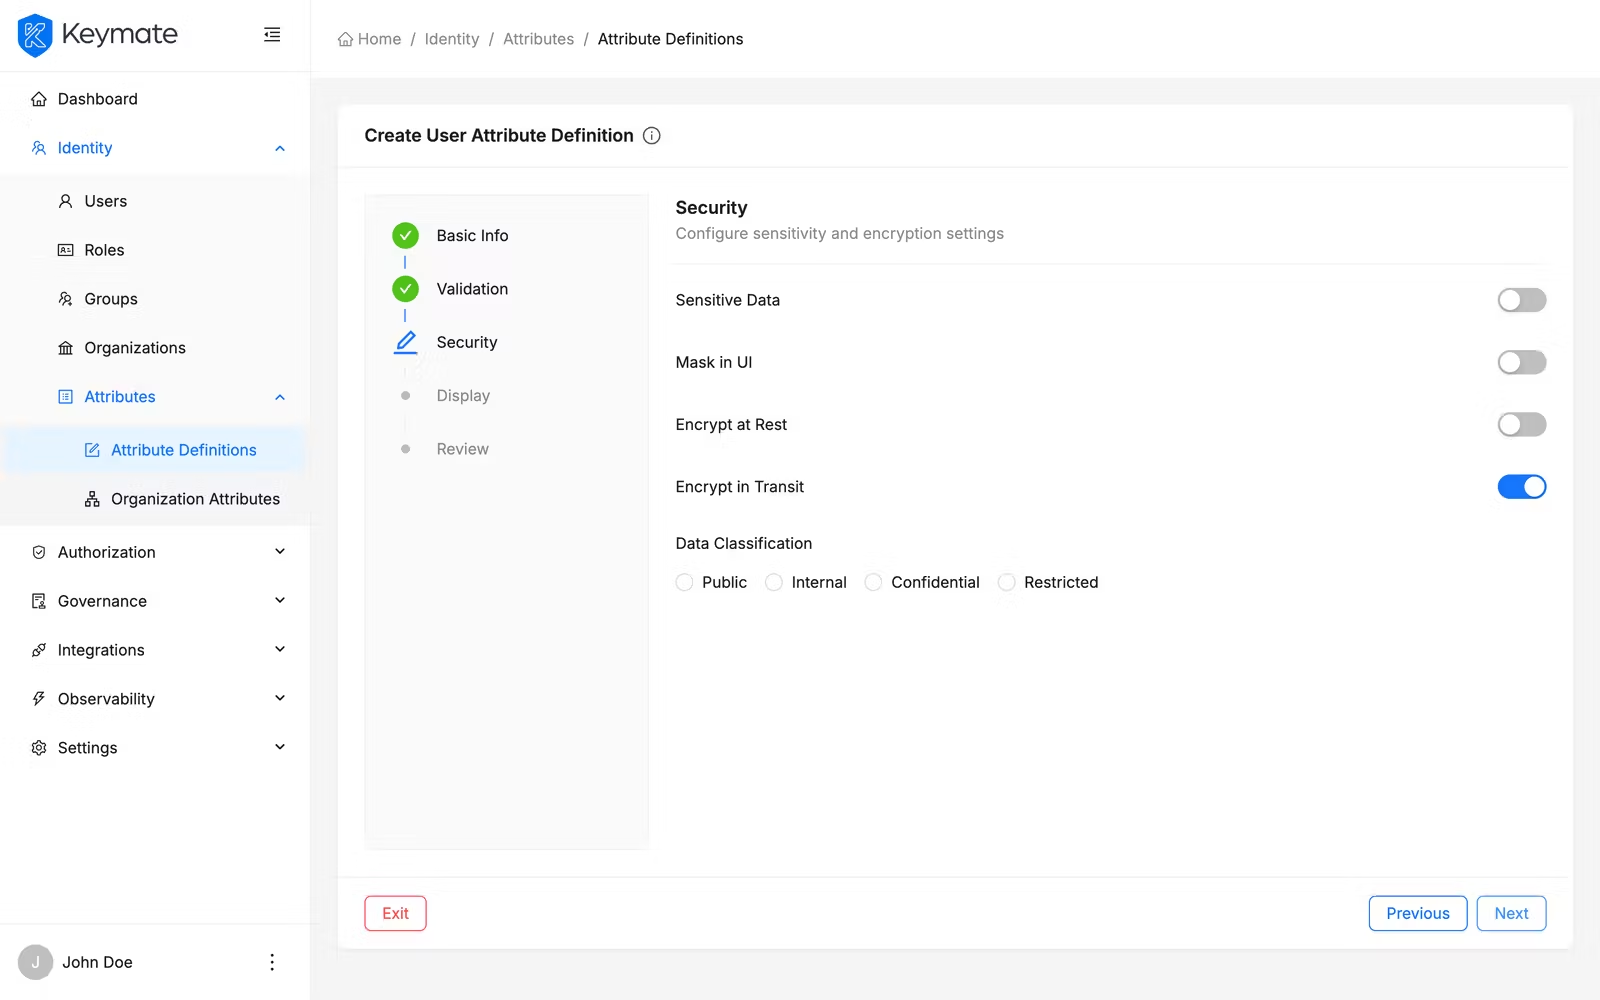
Click Next to proceed to display settings.
6. Configure display settings (Step 4 of 5)
Control where and how the attribute appears:
| Toggle / Field | Description |
|---|---|
| Editable | Whether users or admins can modify the value after creation |
| Visible in UI | Shows the attribute in user-facing interfaces |
| Visible in Token | Includes the attribute value in access tokens |
| Visible in Admin | Shows the attribute in the Admin Console |
| Usage Scope | Multi-select for where the attribute is used: Registration Screen, Login Screen, Profile Edit, Admin Edit |
For this example, enable Editable, Visible in UI, and Visible in Admin. Disable Visible in Token. Select Registration Screen and Admin Edit as the usage scope.

Click Next to review your configuration.
7. Review and confirm (Step 5 of 5)
The review step displays a read-only summary of all settings organized in collapsible sections:
- Basic Info — code, data type, labels, descriptions, source system, and order
- Validation — required field flags, format, regex pattern, min/max length, allowed values (for Select type)
- Security — sensitive data flag, masking, encryption, and data classification
- Display — editable flag, visibility settings, and usage scope
Verify the summary and click Finish to create the attribute definition. On success, you are redirected to the attribute definitions list. If you created a tenant-scoped definition, you are redirected to that tenant's attribute definitions page.
8. View attribute definition details
Click the View action on any row in the attribute definitions list to open the detail page. The detail page displays the Turkish label as the page title (or the code if no Turkish label is set) and organizes settings across four tabs:
| Tab | Content |
|---|---|
| Basic Information | Code, data type, labels, descriptions, source system, order |
| Validation | Required field flags, format, regex pattern, length constraints, allowed values |
| Security | Sensitive data, masking, encryption, data classification |
| Display | Editable flag, visibility settings, usage scope |

9. Edit an attribute definition
On any tab of the detail page, click the Edit button to open an edit drawer. The drawer is pre-populated with the current values for that tab's fields. Modify the fields as needed and click Save.
The tenant field is disabled during editing — you cannot change the scope of an existing definition. To move a definition between global and tenant scope, create a new definition and delete the old one.
10. Delete attribute definitions
You can delete a definition from the detail page or the list page.
From the detail page: Click the Delete action button. A confirmation modal appears. Confirm to delete the definition.
From the list page (single): Click the Delete action in the row's action menu. Confirm in the modal.
From the list page (bulk): Select multiple definitions using the checkboxes, then click the Delete bulk action button in the toolbar. A confirmation modal shows the count of selected definitions. Confirm to delete all selected definitions sequentially.
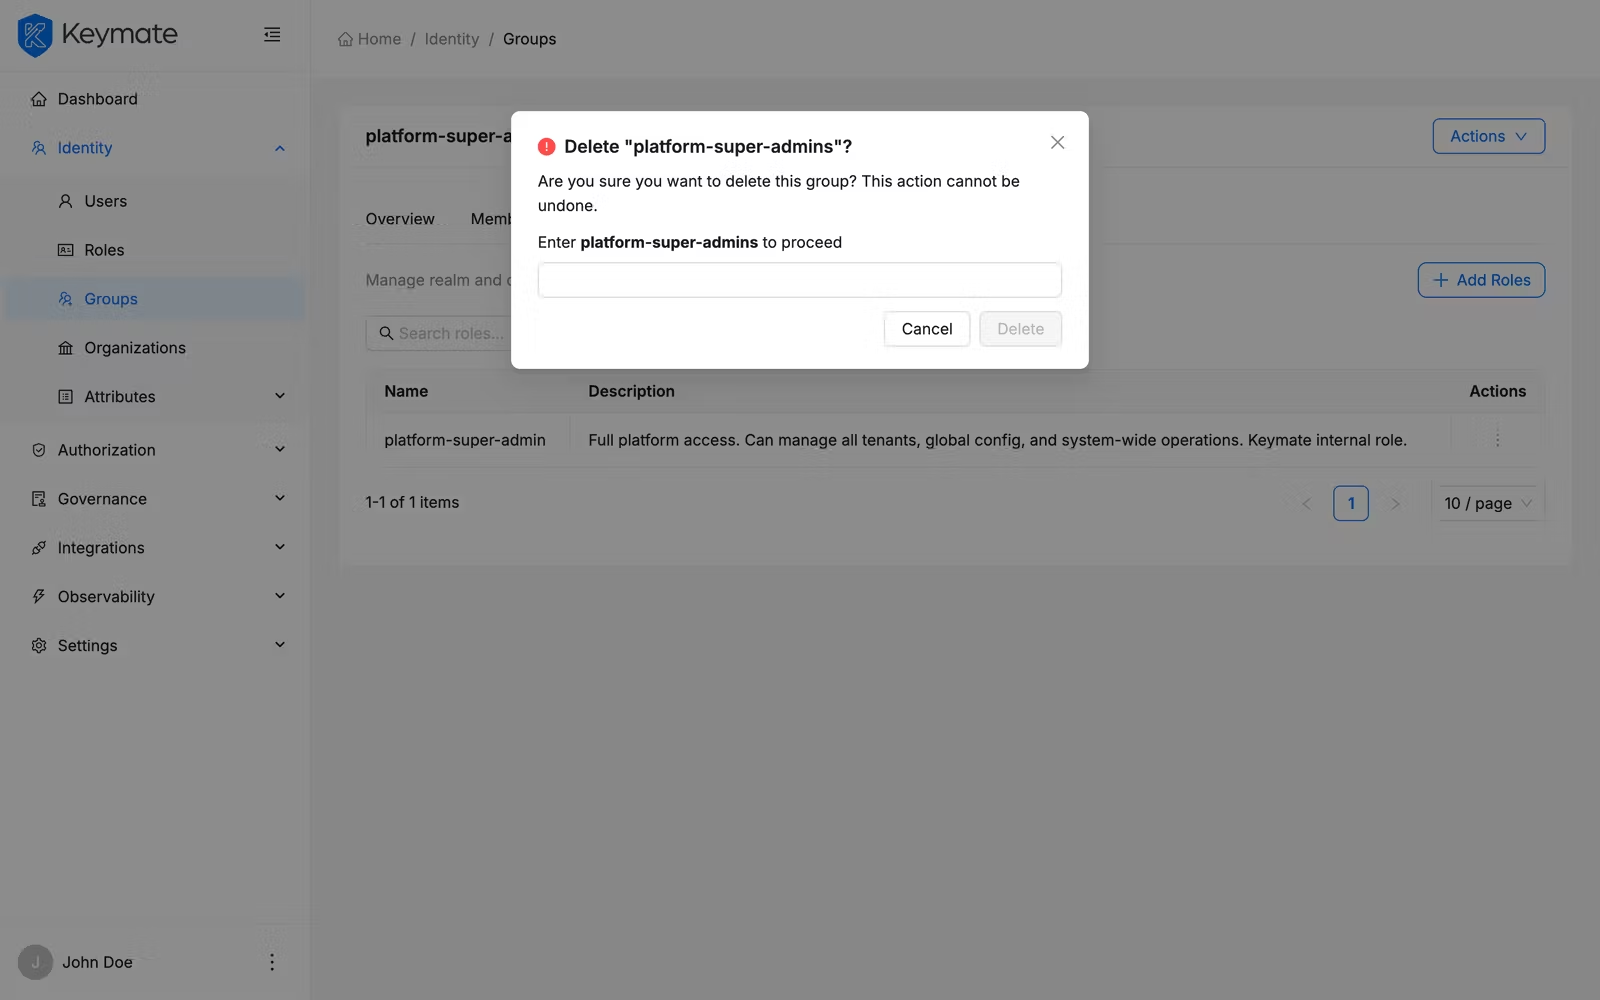
Deleting an attribute definition may affect users who have values assigned for that attribute. This action cannot be undone.
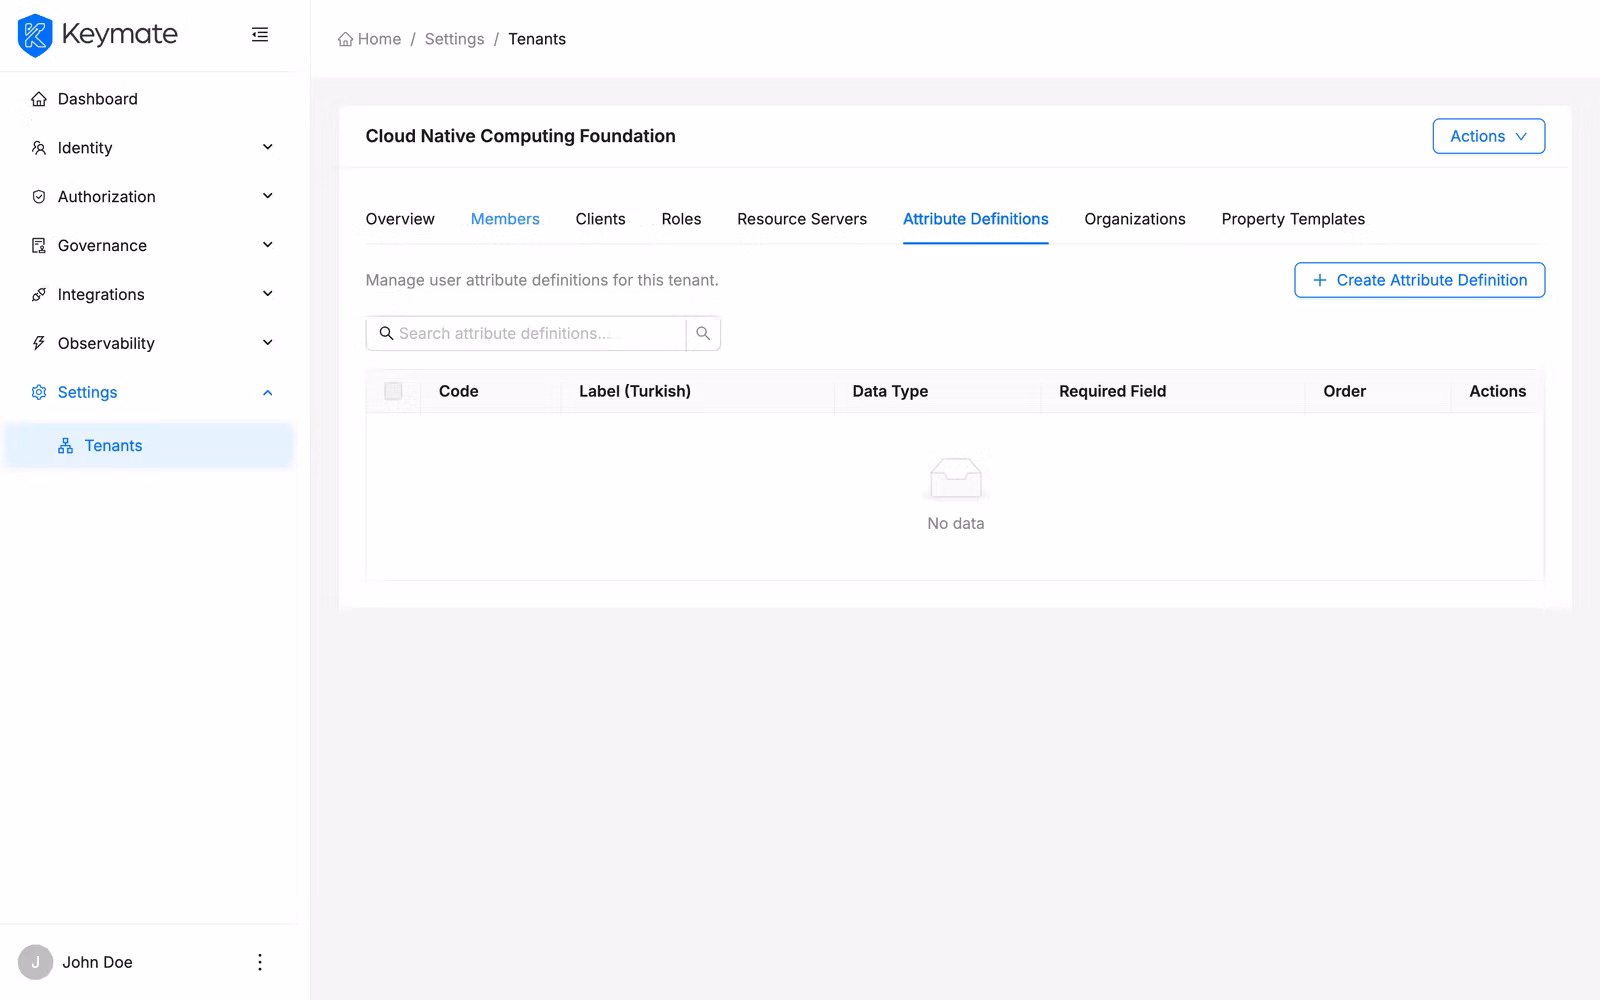
11. Manage tenant-scoped attribute definitions
Tenant-scoped attribute definitions are managed from the tenant settings page. Navigate to Settings > Tenants, select a tenant, and go to the Attribute Definitions tab. This view shows only the definitions scoped to that specific tenant.
You can create, view, and delete definitions from this page using the same flows described above. Definitions created from this page are automatically scoped to the selected tenant.
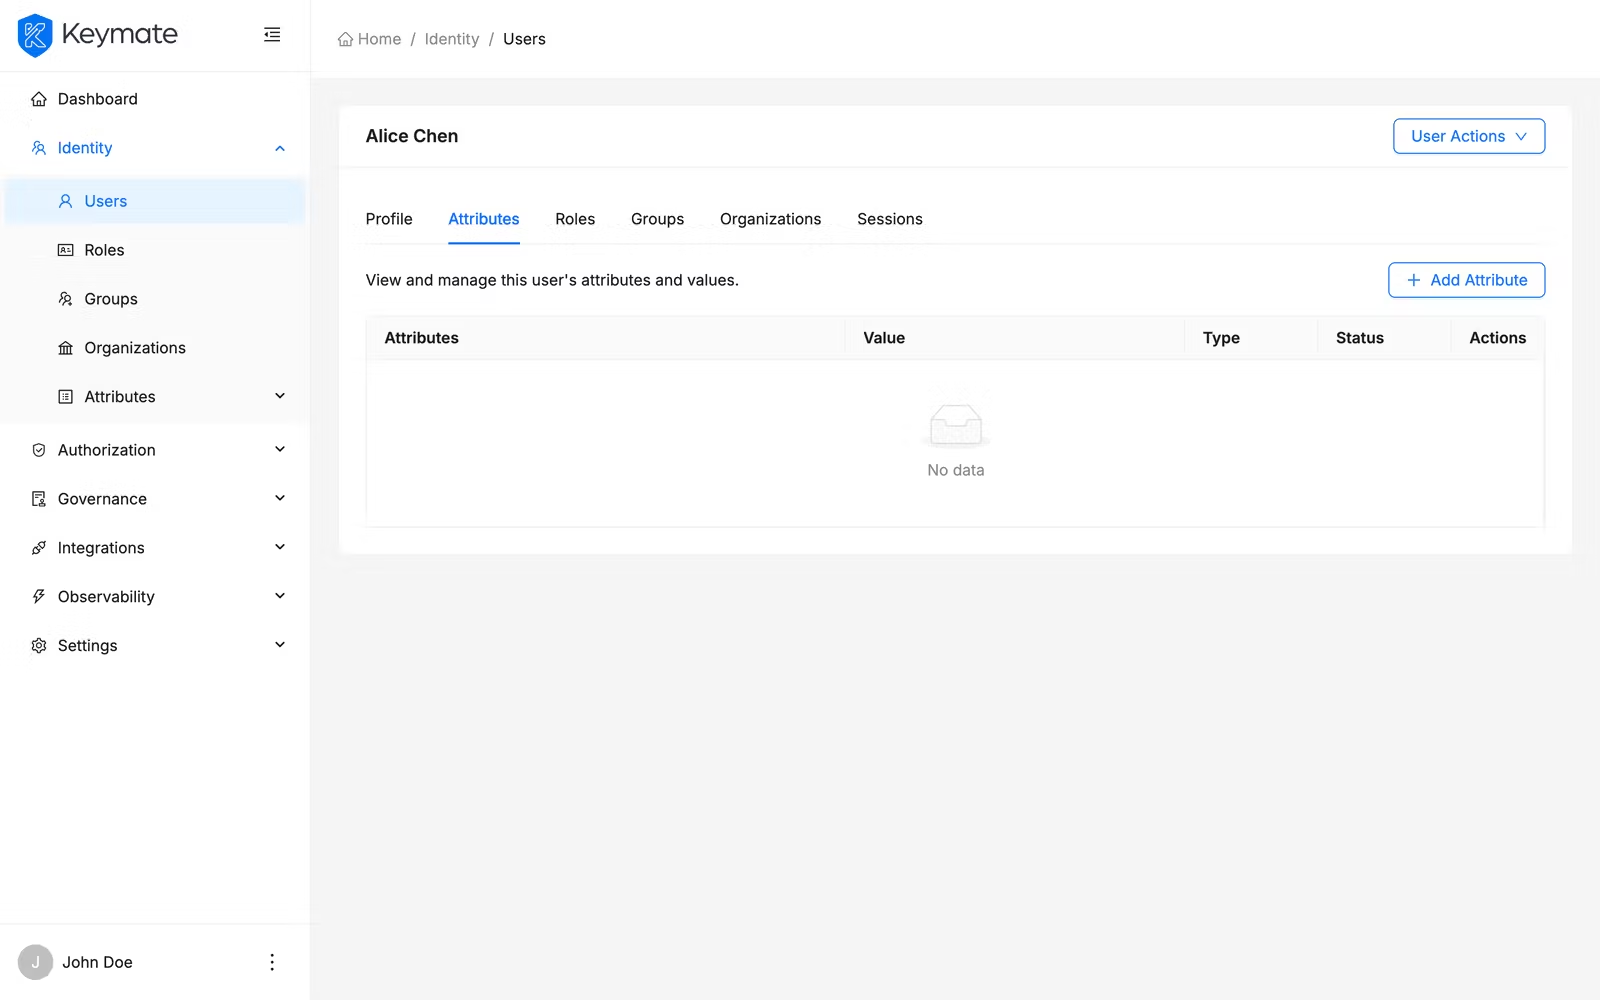
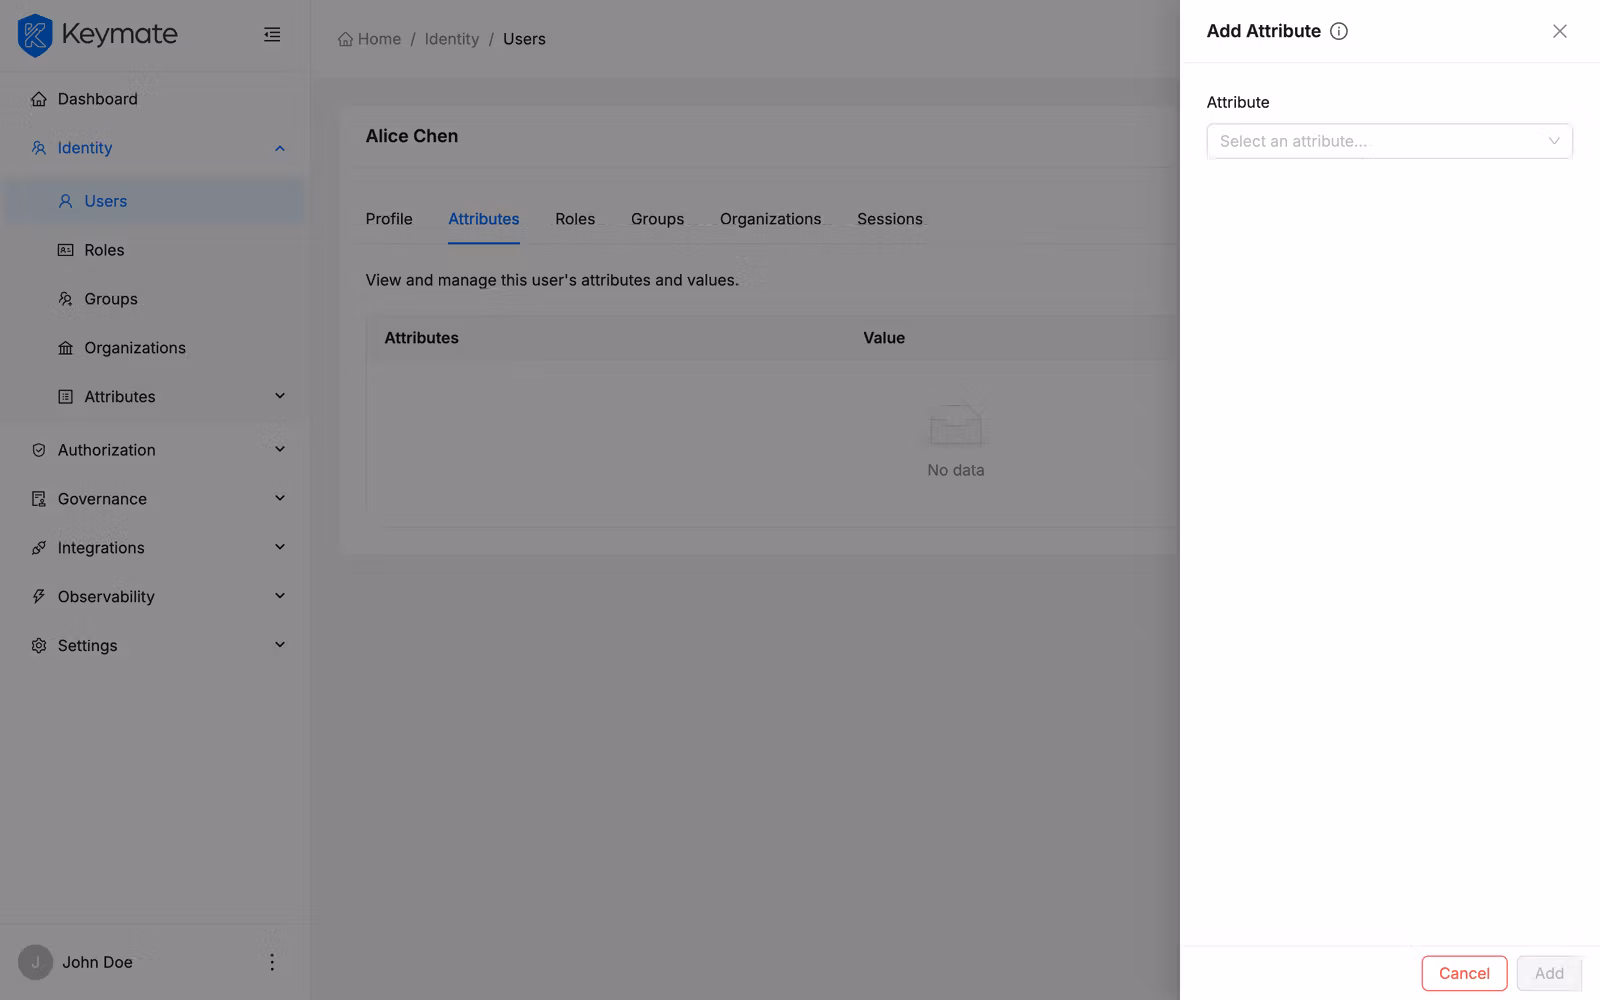
12. Assign attribute values to a user
Attribute values are assigned to users from the user detail page. Navigate to Identity > Users, select a user, and switch to the Attributes tab.
The tab displays a table of the user's assigned attributes with the following columns:
| Column | Description |
|---|---|
| Attribute | Attribute label (resolved from the definition) with a tooltip showing the description |
| Value | Current attribute value |
| Type | Data type tag |
| Status | ACTIVE or INACTIVE badge |
Add an optional attribute
Open the Attribute Actions dropdown and click Add Attribute to open the attribute drawer. Select an attribute from the dropdown — the list shows only unassigned, optional attributes. Enter a value using the type-appropriate input field and click Add.

Edit an attribute value
Click the Edit action next to an attribute row. The attribute drawer opens in edit mode, pre-populated with the current value. Modify the value and toggle the status between Active and Inactive if needed. Click Save.
Remove an attribute value
Click the Delete action next to an attribute row. A confirmation modal appears. Confirm to remove the attribute value from the user.
Read-only attributes do not display edit or delete actions. These attributes are typically managed by external systems (e.g., SCIM provisioning, HRMS synchronization).
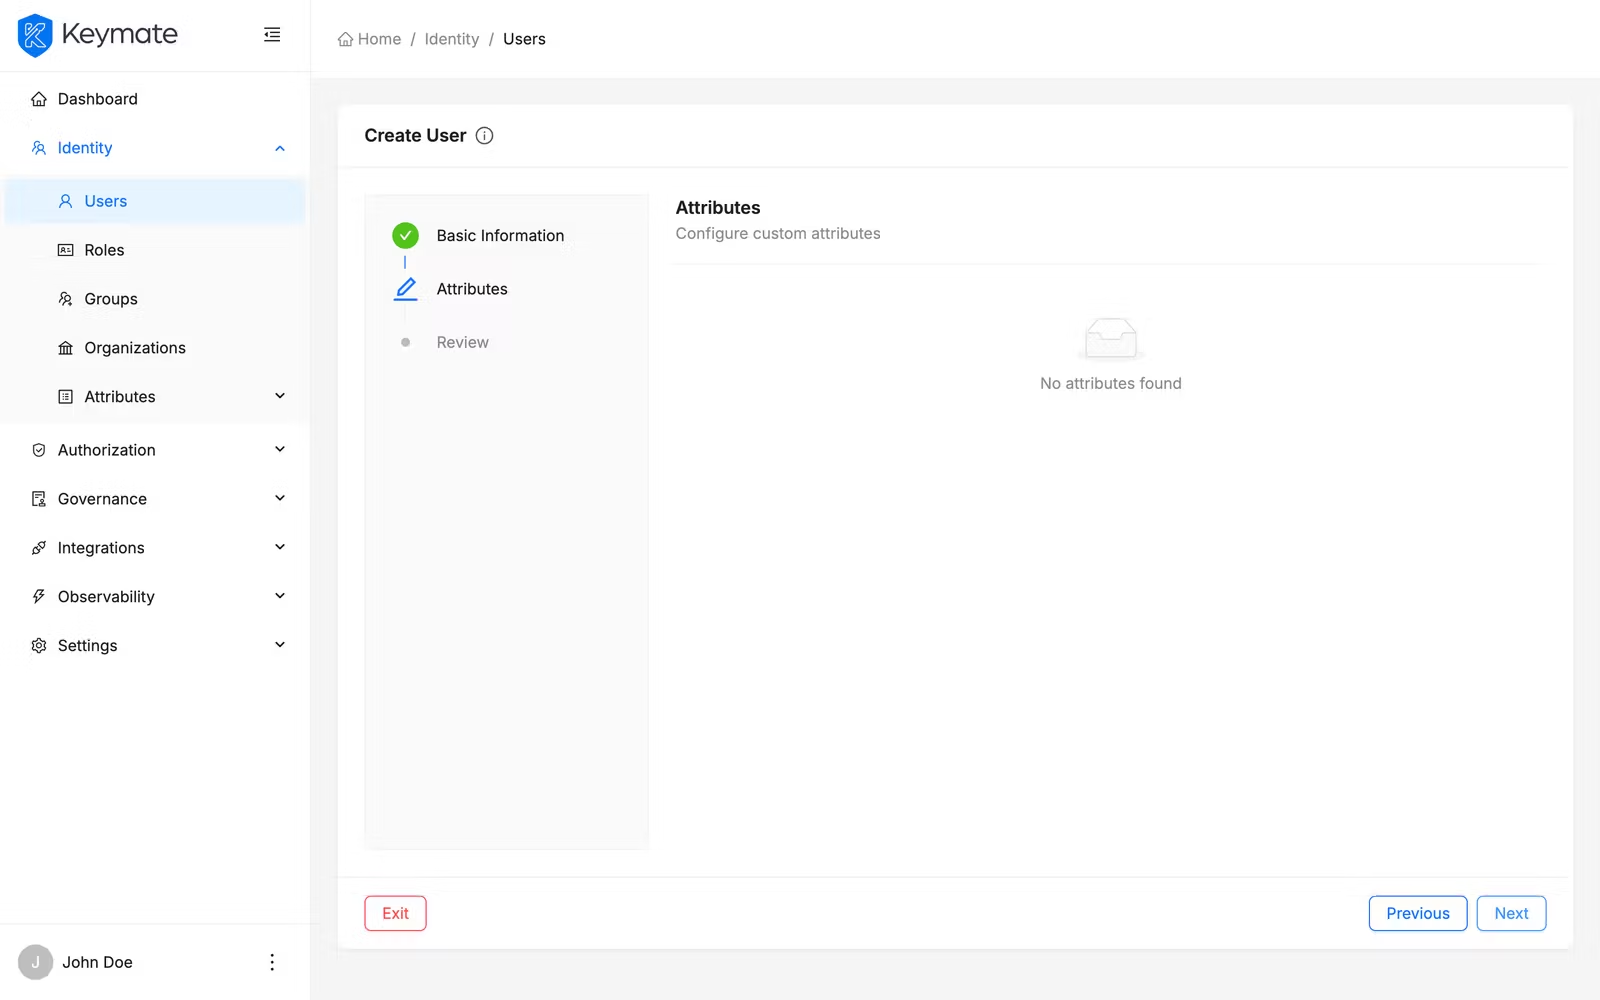
13. Assign attributes during user creation
When creating a new user via the user creation wizard, step 2 (Attributes) displays attribute definitions for the selected tenant (or global definitions if no tenant was chosen). Required attributes appear in a pre-populated table, while optional attributes can be added using the Add Attribute button.
For full details on the user creation wizard, see User & Role Management.
Validation Scenario
Scenario
Create a global attribute definition with code department, type Select, and allowed values Engineering, Product, Design. Assign it to an existing user with the value Engineering.
Expected Result
The definition appears in the attribute definitions list with type Select and required set to No. On the user detail page, the Attributes tab shows the department attribute with value Engineering and status ACTIVE.
How to Verify
- UI evidence: Navigate to Identity > Attributes > Attribute Definitions and confirm
departmentappears in the list. Open the user detail page and check the Attributes tab for the assigned value. - API evidence: Query the attribute definitions and user attributes endpoints to confirm the definition and assigned value exist.
- Logs / traces: Check server logs for successful attribute definition creation and user attribute assignment requests.
- Audit evidence: Review the audit log for attribute definition creation and user attribute assignment events.
Troubleshooting
- New Attribute Definition button is not visible — your account lacks the
CREATEscope on the User Attributes resource. Contact your platform administrator to request the appropriate permissions. - Regex pattern validation fails on user input — verify the regex pattern in the attribute definition is correct. The pattern must be a valid JavaScript regular expression. Test the pattern against expected values before saving.
- Allowed values field does not appear — the allowed values input is only shown when the data type is Select. Change the data type to Select in step 1 of the wizard.
- Attribute does not appear in user creation wizard — attribute definitions are scoped by tenant. Verify the definition's tenant scope matches the tenant selected during user creation, or create a global definition.
- Cannot edit or delete an attribute value on a user — read-only attributes are managed by external systems. Check the attribute's Source System field in the definition to identify the owning system.
- Attribute does not appear in access tokens — verify the Visible in Token toggle is enabled on the definition's Display tab.
Next Steps
- Learn about Attribute Definitions to understand the conceptual model behind attribute schemas
- Explore Attribute Value Inheritance to see how attribute values flow through the organizational hierarchy
- Review Sensitive Data and Compliance Tags for data classification and retention policies
- See Policy Management to use attributes in ABAC policy conditions
Related Docs
Attribute Definition Model
Conceptual model for attribute schemas and types
Sensitive Data and Compliance Tags
Data classification, encryption, and retention for attributes
User & Role Management
Manage users, roles, and assign attributes during user creation
Policy Management
Use attributes in ABAC policy conditions via the Expression Builder